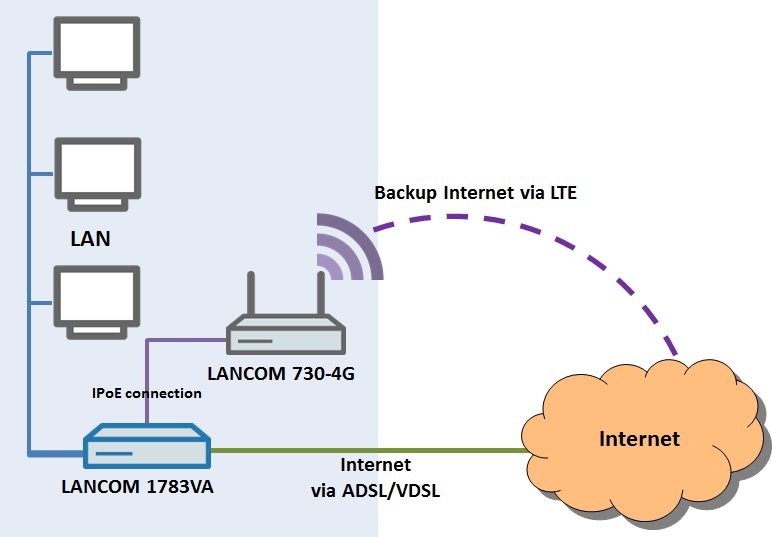
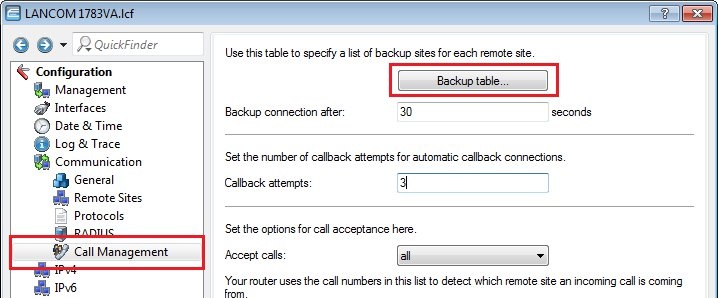
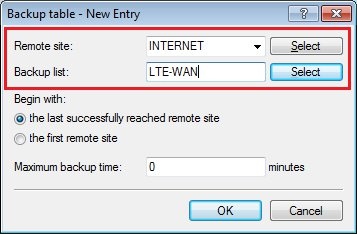
Versionen im Vergleich

Schlüssel

  • Diese Zeile wurde hinzugefügt.
  • Diese Zeile wurde entfernt.
  • Formatierung wurde geändert.
Seiteneigenschaften


Description:
This document describes how to configure a LANCOM 730-4G(+) to operate as an upstream device that provides an LTE/4G Internet connection for a LANCOM router.
The LTE/4G connection provided by the LANCOM 730-4G(+) should act as
a
backup connection.


Requirements:
  • LANtools version 10.10 or later
  • LCOS version 10.00 RU3 or later
  • LANCOM 730-4G(+)
  • LANCOM router with integrated xDSL modem (e.g. LANCOM 1783VA)


Scenario:
  • A company operates a LANCOM 1783VA as a central gateway. Its internal VDSL modem provides the Internet connection via an xDSL line. The xDSL connection is already configured on this device.
  • The requirement is to provide an LTE/4G connection as a backup to the xDSL connection. This is fulfilled by a LANCOM 730-4G(+) using an IPoE connection to the LANCOM 1783VA in order to provide the LTE/4G connection.
Image Removed
Image Added


1) Configuration steps on the LANCOM 730-4G(+):
IMPORTANT:
Hinweis
  • Ensure that the LANCOM 730-4G(+) is in its unconfigured factory state.
  • Also, ensure that the device is not connected to an existing local network via Ethernet cable while you conduct the following configuration steps.
1.1) Connect a PC or laptop to the LANCOM 730-4G(+) with an Ethernet cable.
1.2) Connect the LANCOM 730-4G(+) to the power supply and wait until it has started.
1.3) Because the device
was
was not connected to any local network, it has the default IP address 172.23.56.254 and, by means of DHCP, it assigns an IP address from the range 172.23.56.0/24 to the connected PC or laptop.
1.4) Once you
have
have found the LANCOM 730-4G(+) by conducting a device search in LANconfig, you need to start the Setup Wizard to setup a basic configuration.
1.5) Select the
option
option Basic settings.
Image Removed
Image Added
1.6) Set
a
name for the device.
Image Removed
Image Added
1.7) Create
a
master device password that is complex as possible. This is because the Internet access data are stored on the LANCOM 730-4G(+), which makes the configuration of the router relevant to your security.
Image Removed
Image Added
1.8) It is important that the device operates as
a
DHCP server. With the LANCOM 730-4G(+) is configured as a DHCP server, DHCPoE assigns IP information to the LANCOM 1783VA.
Image Removed
Image Added
1.9) Assign
an
an IP address range that is different from the address range used on your existing local network.
In this example, the IP address range is 172.16.100.0/24 and the device is to receive the address 172.16.100.1.
Image Removed
Image Added
1.10) Accept the system time settings.
Image Removed
Image Added
1.11) In the concluding dialog, click
on
on Finish to write the basic configuration back to the device.
Note:
Info
  • After writing the configuration, the device receives the local IP address 172.16.100.1 and it uses DHCP to assign an IP address from the new address range to the connected PC or laptop.
  • It may take some time before you can reach the device from LANconfig. If necessary, perform a new device search.
Image Removed
Image Added
1.12) Insert
the
the SIM card from your mobile service provider into the card slot of the LANCOM 730-4G(+).
1.13) Start
the
the Setup Wizard in LANconfig again and select the option Set up Internet access.
Image Removed
Image Added
1.14) Select the
option
option Create a new connection for IPv4.
Image Removed
Image Added
1.15) The LTE/4G connection is to be established via
the
the Mobile interface of the device.
Image Removed
Image Added
1.16) Set
your
your country as appropriate.
Image Removed
Image Added
1.17) In this example we are using
an
an LTE/4G connection from T-Mobile.
Image Removed
Image Added
1.18) Enter
the
the PIN supplied by your provider.
Image Removed
Image Added
1.19) You
can
can accept the default settings for the subsequent dialogs.
1.20) In the concluding dialog, click
on
on Finish to write the configuration back to the device.
Image Removed
Image Added
The LTE/4G Internet connection is then established. You can check this by loading the LANCOM 730-4G(+) into LANmonitor.
1.21) Remove the Ethernet cable from your PC or laptop and insert it into a free Ethernet port on the existing LANCOM router (e.g. LANCOM 1783VA).
In this example,
the
the LANCOM 730-4G(+) is connected to port ETH-3 of the LANCOM 1783VA.


2) Configuration steps on the existing LANCOM router:
2.1) Using the Ethernet cable, connect your PC or laptop to
the
the existing local network so that you can access the LANCOM 1783VA with LANconfig.
In this example,
the
the existing local network has the IP address range 192.168.100.0/24 and the LANCOM 1783VA has the IP address 192.168 100.1.
2.2) Start
the
the Setup Wizard in LANconfig again and select the option Set up Internet access.
Image Removed
Image Added
2.3) Select the
option
option Create a new connection for IPv4.
Image Removed
Image Added
2.4) The connection is directed via one of the Ethernet ports of the LANCOM 1783VA.
Image Removed
Image Added
2.5)
Since
Since ETH interface 3 of the LANCOM 1783VA is used to connect to the LANCOM 730-4G(+), this is the interface that must be used.
Image Removed
Image Added
2.6) Set
your
your country as appropriate.
Image Removed
Image Added
2.7) The Internet is accessed through
an
an IPoE connection to the upstream LANCOM 730-4G(+).
Image Removed
Image Added
2.8 Give
the
the second Internet connection a unique name.
Image Removed
Image Added
2.9) The simplest solution is for the LANCOM 1783VA to receive its IP parameters for the Internet
connection
connection via DHCP from the upstream LANCOM 730-4G(+).
Image Removed
Image Added
2.10) No VLAN tag is required for the IPoE connection.
Image Removed
Image Added
2.11) Set
up
up link monitoring that pings public IP addresses entered by you.
Image Removed
Image Added
2.12)
Enter
Enter one or more public IP addresses. In this example, the public IP address of the Google DNS server is pinged.
Image Removed
Image Added
2.13) No backup connection is used.
Image Removed
Image Added
2.14) Leave the settings for the previous default route.
Image Removed
Image Added
2.15) In the concluding dialog, click
on
on Finish to write the configuration back to the device.
Image Removed
Image Added
2.16) Open the configuration of the LANCOM router in LANconfig and switch to the menu
item
item Communication
->
Call management
->
Backup table.
Image Removed
Image Added
2.17)
Create
Create a new entry with the remote site set to the xDSL connection on the LANCOM 1783VA and the backup link set to the newly created IPoE connection to the LANCOM 730-4G(+).
Image Removed
Image Added
2.18) Write the configuration back to the LANCOM router. This concludes the configuration.
You can test the configuration by unplugging the RJ-45 connector from the xDSL socket on the LANCOM 1783VA to interrupt the Internet connection.
The backup connection via the LANCOM 730-4G(+) is established after the specified time (in this example and by default: 30 seconds). As soon as the xDSL connection via the LANCOM 1783VA becomes available again, the backup link via the LANCOM 730-4G(+) disconnects.