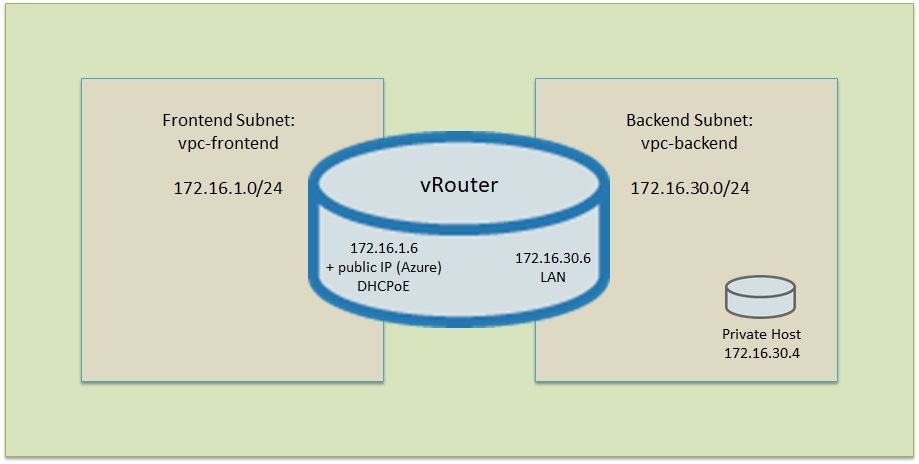
This document describes how to create an Azure-based virtual network with two subnets that are connected through the vRouter. In this case, one subnet acts as a front end (in our case as an intermediate network towards the Internet) and one subnet as a back end containing private resources (such as a Linux instance). The vRouter controls access to the back-end network. It also accepts VPN connections and manages VPN connections to existing on-premises infrastructure.
Requirements:
- You need a Microsoft Azure account that has permissions to create the resources described here. The steps described here are executed via the Azure portal. Log in to the portal to start the setup.
- You also need a license for the vRouter.
Procedure:
1) Creating a virtual network (VNET) and the first subnet
- In the Azure portal, add a virtual network. In our example we use the name vpc-demo and the address range 172.16.0.0/12.
- Select the settings for subscription, resource group, and region for your Azure environment.
- The mask for creating the virtual network requires you to specify a subnet already contained in this network. In our example, we now specify the front-end subnet vpc-frontend with the address range 172.16.1.0/24.
2) Creating the second subnet
- In the Azure portal, move to the configuration of the newly created VNET vpc-demo and go to the sub-item Subnets. Add the back-end subnet.
- In our example, we now specify the subnet vpc-backend with the address range 172.16.30.0/24.
3) Creating the vRouter instance
- For this example we use the name vpc-vrouter for the vRouter instance and set the VM size to B1s.
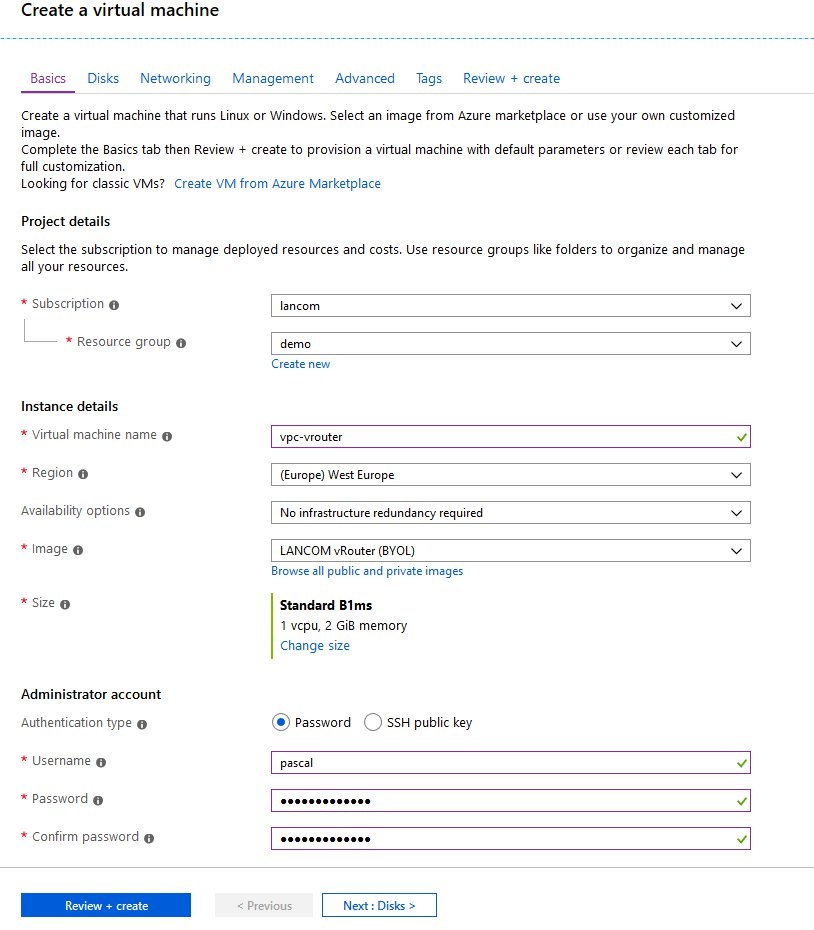
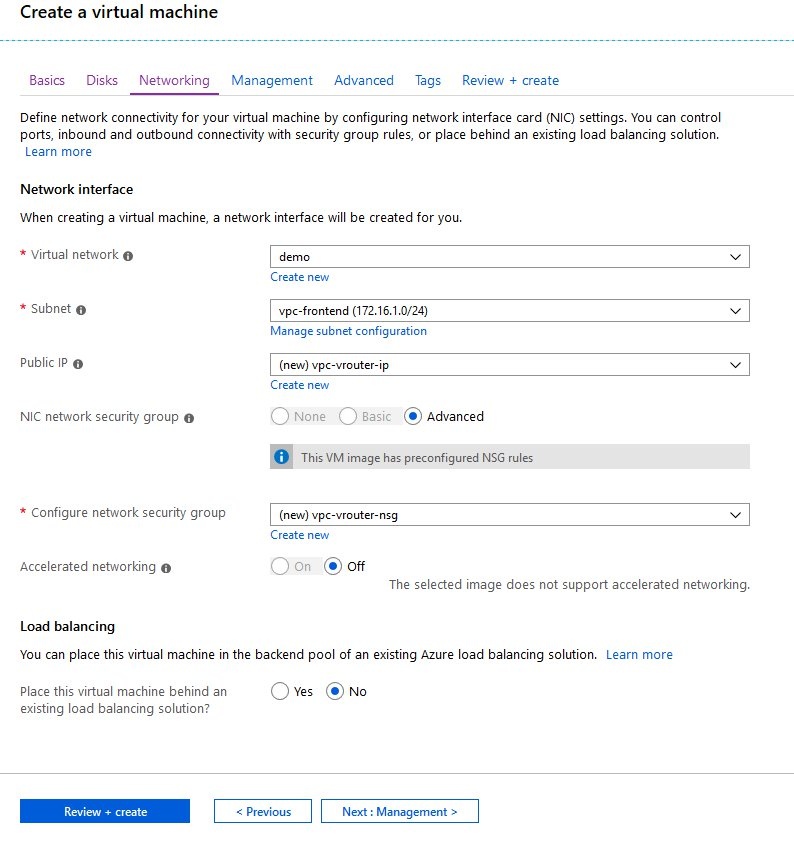
- On the tab Networking, configure the previously created VNET vpc-demo for the vRouter. Set the Subnet to the previously created subnet vpc-frontend—this connects the vRouter instance to the first network interface with the front-end network. This is important because Azure only allows one IPoE/DHCPoE connection to be established via the first network interface of a VM containing a vRouter. Accordingly, we will set up an additional network interface to connect to the back-end network in a later step.
- You also specify a public IP for the vRouter, or you accept the presetting and create a new address.
- Select the automatically created network security group from the drop-down menu. This allows port filtering to be performed in front of the vRouter.
By default, the network interfaces of the vRouter receive an IP address in the Azure back-end via DHCP. For router operations, it makes sense to assign these addresses permanently.
Note that the configuration of the vRouter should still be set to obtain the addresses via DHCP. Setting the fixed IP addresses is done with the Azure interface; the vRouter will be assigned these fixed IP addresses via DHCP.
- In the settings of the newly created vRouter VM, navigate to the item Networking. You now see the configuration of what is currently the only network interface of the vRouter.

- Click on the name of the network interface (here: vpc-vrouter441) to continue with the configuration.
- In the network interface settings, switch to the item IP configurations.
- Activate the configuration item IP forwarding to allow the vRouter to act as a router for IP packets.
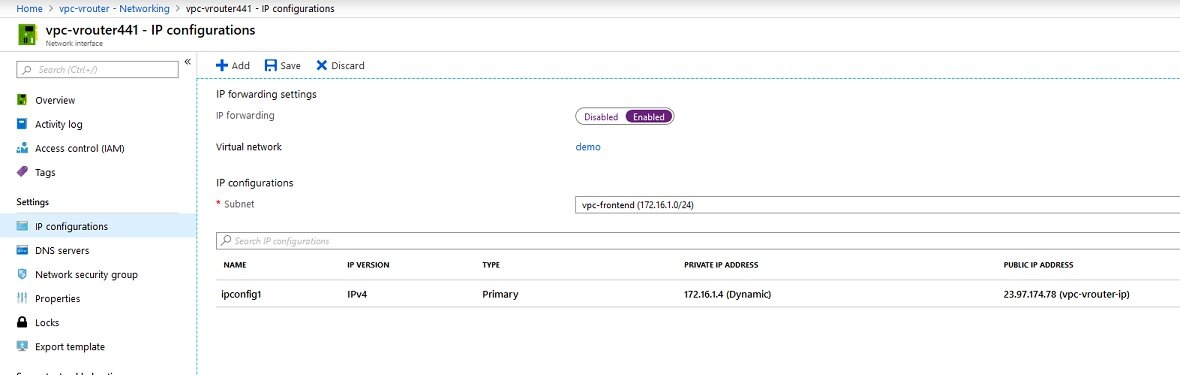
- Now switch to the ipconfig1 item in the table below. Under Assignment, you can specify a static IP address.
- In our example we use the one mentioned above, i.e. IP address 172.16.1.6. Save the changes.

- Return to the settings of the newly created vRouter VM and navigate to the item Networking.
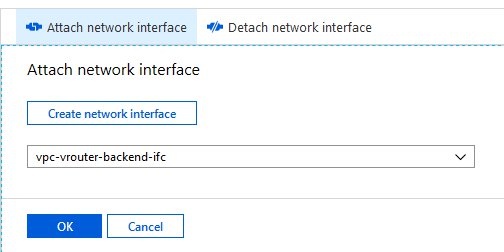
- Here you select Attach network interface and subsequently Create network interface to create the network interface for the back-end subnet.
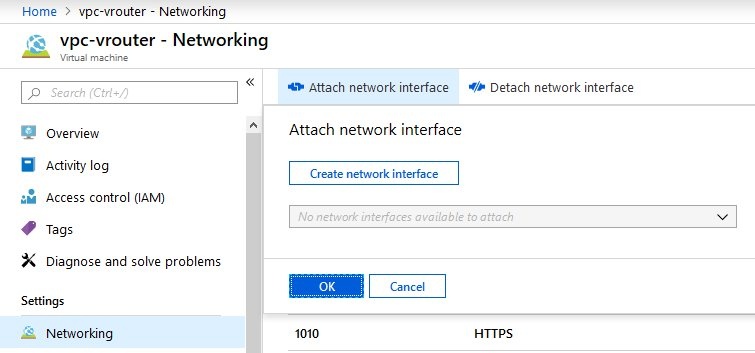
- Configure the new network interface for the subnet vpc-backend and assign a static IP address. According to our scheme, we use the private IP address 172.16.30.6.
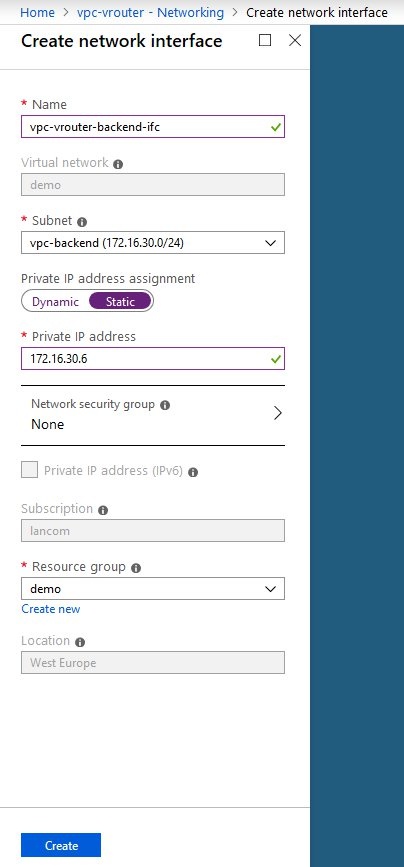
- After being setup, the new network interface now needs to be attached to the vRouter VM.
- To do this, first shut down the vRouter VM (the Shutdown switch on the VM’s overview page).
This concludes the configuration of the network interface.
5) Configuring a custom routing table
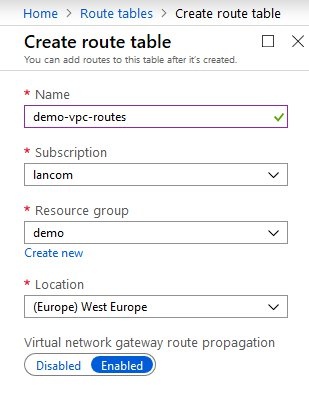
In order for the resources (e.g. VMs) in the back-end network to use the vRouter as a gateway, the routing table has to be adjusted to the back-end network in Azure.
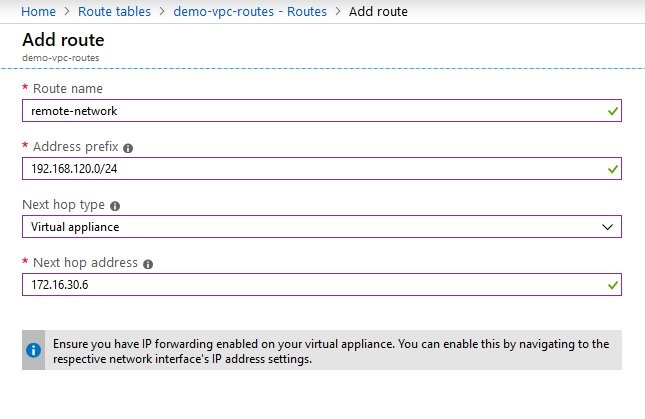
- In the Azure Administration, go to the Route tables service (e.g. by means of the search window). Use Add route to create a new routing table.
- Create a new route that sends all traffic to the IP address of the vRouter in the back-end subnet. Set a route name of your own choice.
- For the items Address prefix and Next hop type, use the settings as shown in the screenshot.
- For the item Next hop address, enter the IP address of the subnet vpc-backend created in step 4 (i.e. 172.16.30.6).
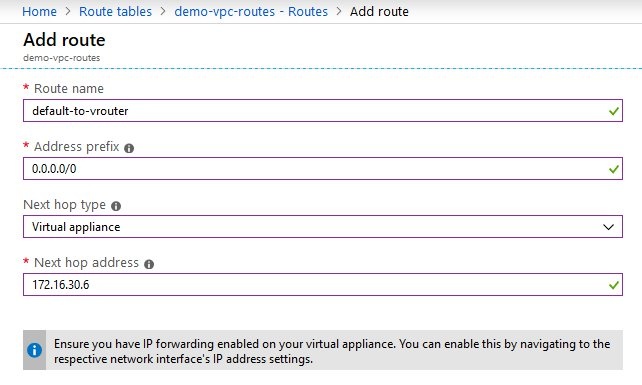
- In the same way, create a specific route for a VPN network to be reached via the vRouter.
- Now switch to the configuration item Subnets and assign the newly created routing table to the back-end subnet.
This concludes the basic configuration of our scenario.
6) Creating an Ubuntu VM in the back-end network
In this step, we create an Ubuntu VM in the back-end network to be accessed through the vRouter. This is for testing purposes only; in the real world, the back-end network contains your own private services/VMs.
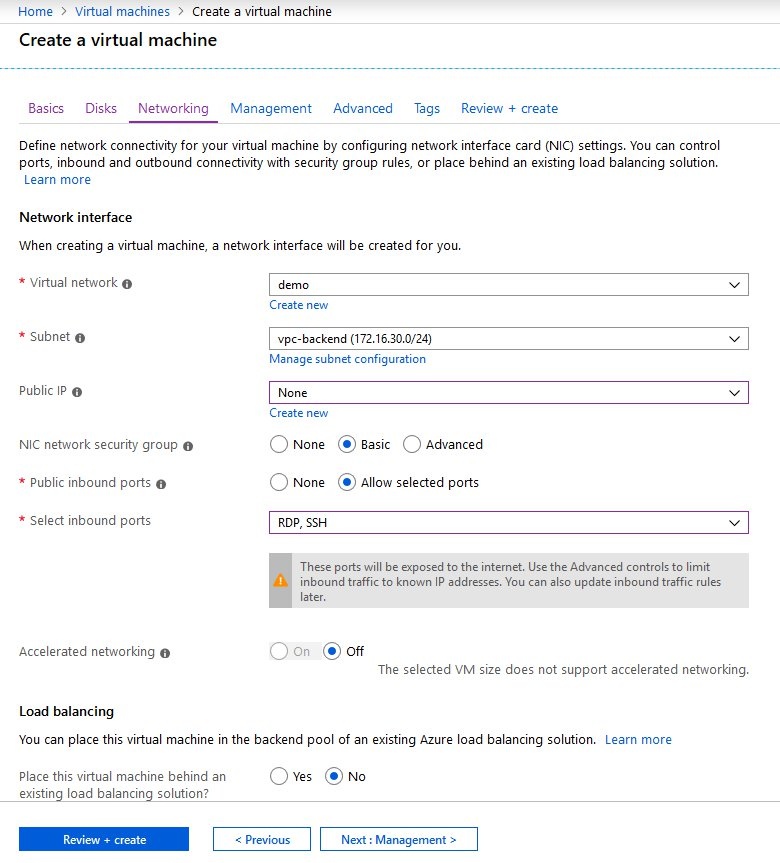
- Add a new VM in Azure. Be sure to allow access via the SSH protocol so that we can subsequently test the access to it. As an alternative, you can remove the network security group to remove all restrictions.
- When creating the VM, on the tab Networking make sure that the network interface is created in the back-end subnet (here: vpc-backend).
7) Configuring a VPN connection to the vRouter
In the final step, we configure an (IKEv2) VPN connection to the vRouter to gain secure access to the private resources in the back-end subnet.
We recommend that you first set up a DNS name for the public IP address of the vRouter and then configure the VPN connection to connect to this DNS name. This procedure is described here:
https://docs.microsoft.com/en-us/azure/virtual-machines/windows/portal-create-fqdn
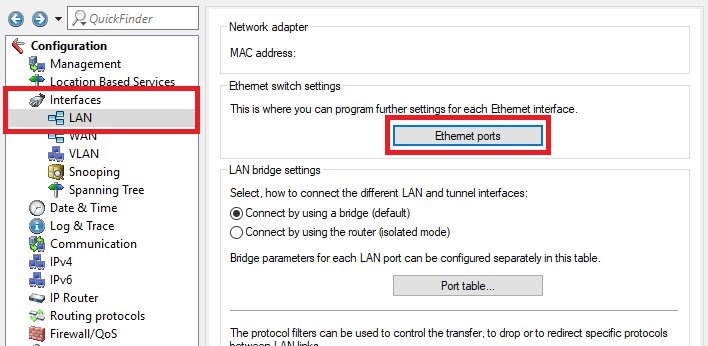
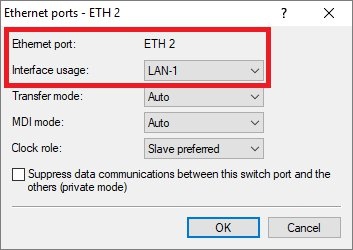
- In the next step, assign the Ethernet port ETH-2 to the logical interface LAN-1.
ETH-2 corresponds to the second virtual network interface that we assigned to our vRouter VM. By default, LCOS uses the logical interface LAN-1 for the IP network Intranet, which corresponds to our back-end subnet. This configuration allows for this.
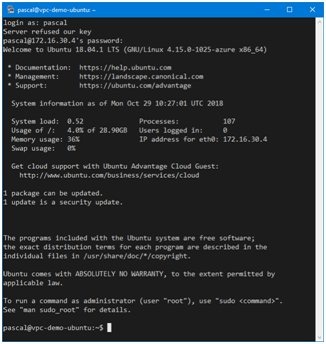
8) Testing
Our VPN connection should now provide access both to the LAN interface of the vRouter and the Ubuntu VM in the back-end subnet. In our example, a local PC can establish an SSH connection to the Ubuntu VM in the secure back-end network via the VPN connection terminated at vRouter.

 ·
·