Description:To secure communication between the LANCOM R&S®Unified Firewalls and the LANCOM R&S®UF Command Center, the firewall establishes an SSL VPN connection to the LANCOM R&S®UF Command Center.
This connection is secured by certificates. Consequently, it is necessary to set up the appropriate certificates and trust settings for the connection.
This document describes how you add a LANCOM R&S®Unified Firewall to the Command Center.
Requirements:Procedure:1) Create the required Certificate Authorities (CA) and certificates on the LANCOM R&S®Unified Firewall:1.1) Open the menu
Certificate management -> Certificates.
1.2) Create a new
Certificate Authority (CA) by clicking on the
blue plus button.
- Set the certificate Type to CA for VPN/Web server certificates.
- Set a Common Name for the certificate authority.
- Set the Validity period and enter a Private key password. Finally, click on Create.

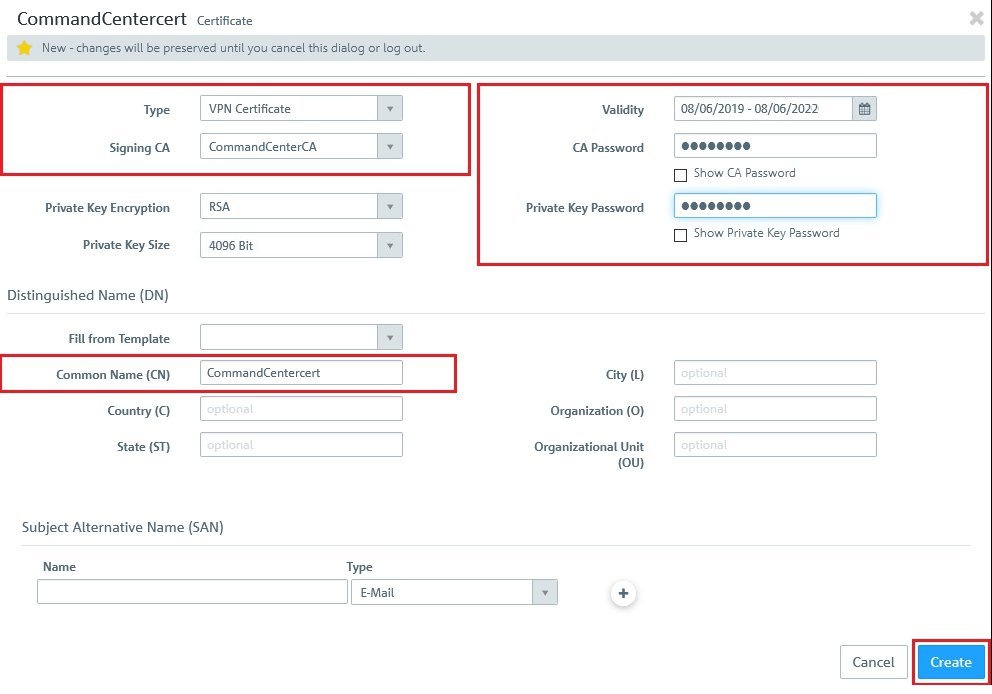
1.3) Create a
certificate by clicking on the
blue plus button.
- Set the certificate Type to VPN certificate.
- Set the Signing CA to the Certificate Authority (CA) created in step 1.2.
- Set a Common Name for the certificate.
- Set the CA password to the private key password entered in step 1.2.
- Set a private key password. Finally, click on Create.
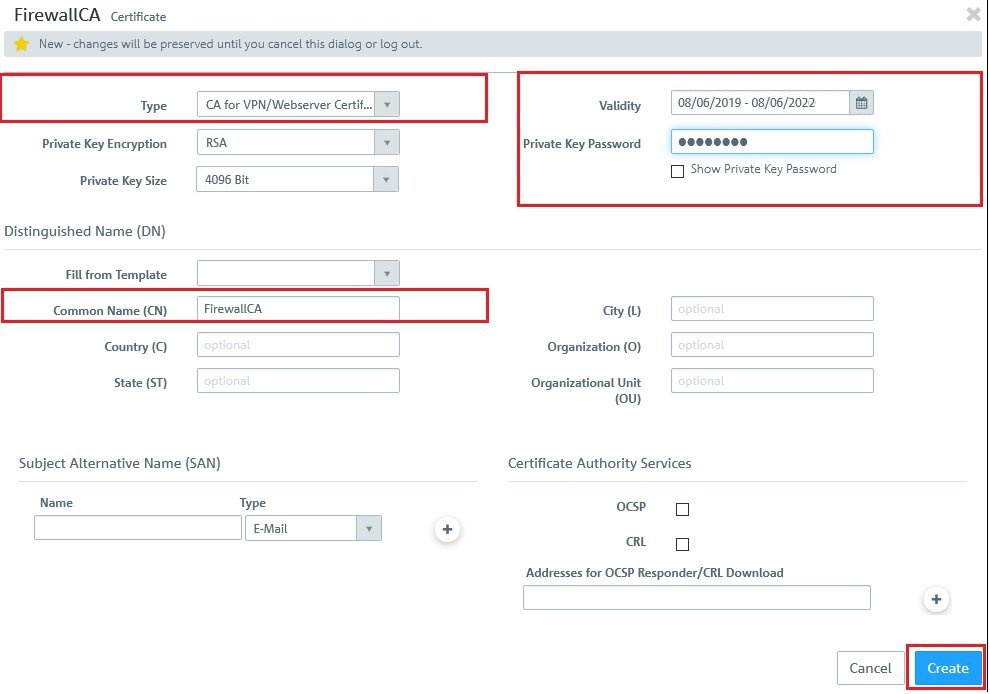
1.4) Create another
Certificate Authority (CA) by clicking on the
blue plus button.
- Set the certificate Type to CA for VPN/Web server certificates.
- Set a Common Name for the certificate authority.
- Set the Validity period and enter a Private key password. Finally, click on Create.
1.5) Create a
certificate by clicking on the
blue plus button.
- Set the certificate Type to VPN certificate.
- Set the Signing CA to the Certificate Authority (CA) created in step 1.4.
- Set a Common Name for the certificate.
- Set the CA password to the private key password entered in step 1.4.
- Set a private key password. Finally, click on Create.

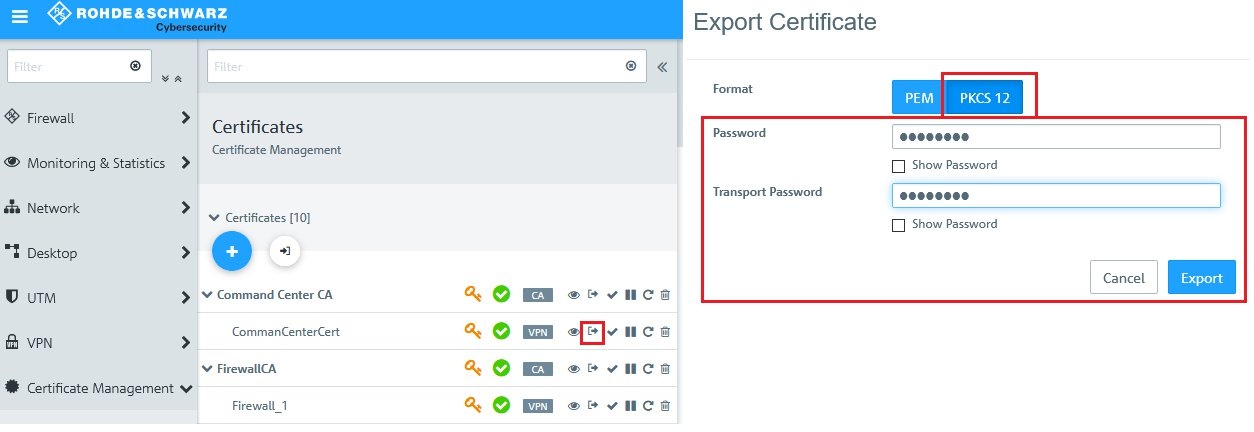
1.6) Expand the list under Certificate Management and
export the Command Center certificate.- Do this by clicking on the export icon.
- In the following dialog, select the option PKCS 12.
- Set the password to the private key password entered in step 1.5.
- Set any transport password. Then click on Export.
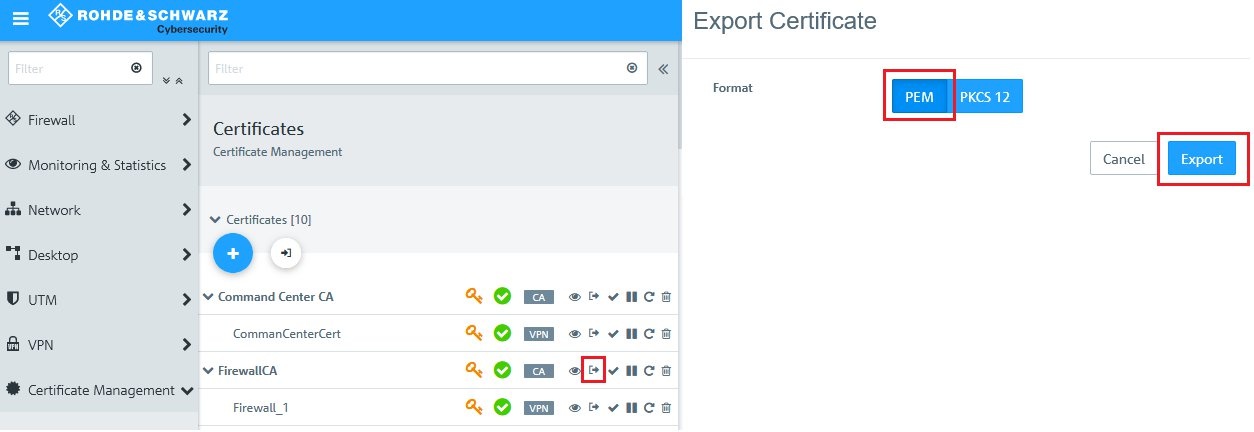
1.7)
Now you export the firewall CA.- Do this by clicking on the export icon.
- In the following dialog, select the option PEM.
 2) Import the Certificate Authority and the certificate into the LANCOM R&S®UF Command Center:
2.1) Open the menu
Settings > Device connections.
2.2)
Import the
command center certificate that you exported
in step 1.6.
2.3)
Import the
firewall CA that you exported
in step 1.7 into the
accepted remote CAs.
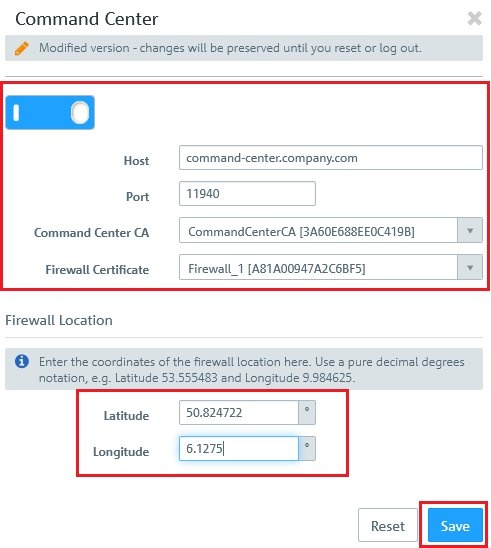
3) Enabling the use of the Command Center on the LANCOM R&S®Unified Firewall:3.1) Open the menu
Firewall -> Command Center.
3.2)
Enable the use of the Command Center and set
the following parameters:
- For the Host you enter the (IP) address where the LANCOM R&S®Unified Firewall can reach the LANCOM R&S®UF Command Center.
- If the LANCOM R&S®Unified Firewall and the LANCOM R&S®UF Command Center are on the same network, this is the IP address of the LANCOM R&S®UF Command Center.
- If the LANCOM R&S®Unified Firewall and LANCOM R&S®UF Command Center are on different networks, this is the IP address of the gateway in front of the LANCOM R&S®UF Command Center. Also, port forwarding has to be set up on the gateway.
- You have to enter the Port number where the LANCOM R&S®Unified Firewall can reach the LANCOM R&S®UF Command Center.
- If the LANCOM R&S®Unified Firewall and LANCOM R&S®UF Command Center are on the same network, the default port (11940) remains unchanged.
- If the LANCOM R&S®Unified Firewall and LANCOM R&S®UF Command Center are in different networks, this is the port on the gateway that forwards to the LANCOM R&S®UF Command Center.
- Set the Command Center CA as the Command Center CA created in step 1.2.
- For the Firewall Certificate, use the certificate created in step 1.5.
- You can optionally enter the GPS coordinates of the location of the LANCOM R&S®Unified Firewall so that the LANCOM R&S®Unified Firewall is displayed correctly on the dashboard map.
 4) Mark the LANCOM R&S®Unified Firewall as administrated in the LANCOM R&S®UF Command Center:
4.1) Open the menu
Firewalls > Device selection.
4.2) Set the
Status of added firewall to Administrated.4.3) The newly added LANCOM R&S® Unified Firewall is then
displayed in the dashboard of the LANCOM R&S®UF Command Center. 