Versionen im Vergleich

Schlüssel

  • Diese Zeile wurde hinzugefügt.
  • Diese Zeile wurde entfernt.
  • Formatierung wurde geändert.
Seiteneigenschaften


Description:
This document describes how certificates created by LANCOM Smart Certificate are used for a certificate-based VPN client connection.
Hinweis

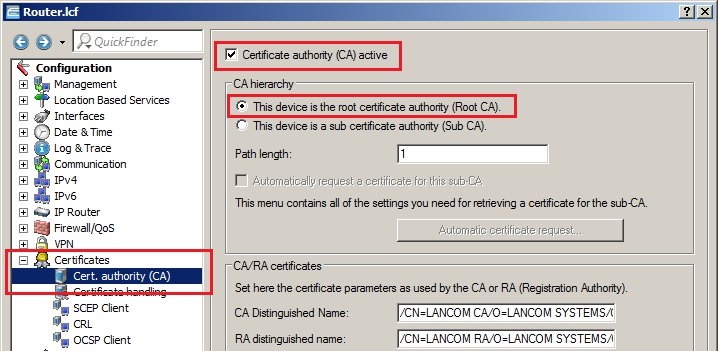
In 2019 the IETF (Internet Engineering Task Force) has designated IKEv1 as deprecated and insecure and therefore it should not be used anymore. LANCOM Systems instead recommends to use the current standard IKEv2.

The IKEv1 functionality in LANCOM devices remains intact and can still be used for scenarios where devices without IKEv2 support are used. However LANCOM Systems will not provide any support regarding the troubleshooting of connection problems with IKEv1 connections. Also there won't be any bug fixes or new features for IKEv1.

In rare cases a disconnect can occur during rekeying. In such a case it can be useful to increase the lifetimes, so that the disconnects occur less often.

Info

The configuration of a certificate-based IKEv2 connection between the Advanced VPN Client and a LANCOM router is described in this Knowledge Base article.


Requirements:
  • LCOS as of version 9.10
or later
or later
  • (download latest version)
  • LANCOM Advanced VPN Client (download latest version)
  • LANCOM central-site gateway, WLAN controller, or LANCOM router with an activated VPN 25 Option
  • Certificates for LANCOM routers and the LANCOM Advanced VPN Client. How to create certificates with LANCOM Smart Certificate is described in
the following
Image Removed
  • .


Procedure:
1) Enable the CA function in the LANCOM router
1.1) In LANconfig, open the configuration dialog for the LANCOM router and switch to the menu item Certificates
->
Cert. authority (CA).
1.2) Set a check mark for the option Certificate authority (CA) active. The LANCOM router functions as the root certificate authority (root CA).
Note:
Info

For this configuration example we leave all of the other parameters with their preset values.

Image Removed

Image Added


2) Upload of the router certificate to the LANCOM router
2.1) Right-click on the LANCOM router in LANconfig and select the option Configuration management
->
Upload certificate or file.
Image Removed
Image Added
2.2) In the following dialog select the certificate file intended for the LANCOM router.
2.3) In the certificate type field, select a VPN container.
2.4) In the Cert. password box enter the password for the certificate file. Click on Open to start the upload.
Image Removed
Image Added


3) Configure the certificate-based VPN client connection on the LANCOM router
3.1) Start the Setup Wizard in LANconfig and select the option Provide remote access (RAS, VPN).
Image Removed
Image Added
3.2) Select the option VPN connection over the Internet.
Image Removed
Image Added
3.3) Disable the option ... 1-Click VPN.
Image Removed
Image Added
3.4) In this example, we do not use IPSec-over-HTTPS.
Image Removed
Image Added
3.5) Enter a name for the new VPN connection.
Image Removed
Image Added
3.6) In the next dialog, specify the public IP address or DNS name of the LANCOM router.
Image Removed
Image Added
3.7) For this connection, select the option Certificates (RSA signature) and Main mode for VPN connection authentication.
Image Removed
Image Added
3.8) In the next dialog box you enter the identities of the certificates.
  • As the local identity, enter the name of the certificate in the LANCOM router.
  • As the remote identity, enter the name of the certificate in the VPN client.
Image Removed
Image Added
3.9) Enter a local IP address for the LANCOM Advanced VPN Client.
Image Removed
Image Added
3.10) In this example, all of the local IP addresses should be available to the VPN client.
Image Removed
Image Added
3.11) NetBIOS is not used in this example.
Image Removed
Image Added
3.12) In the dialog that follows, specify the path where the VPN profile file (*.ini) is to be stored.
Image Removed
Image Added
3.13) Click on Finish to conclude the Setup Wizard. The configuration is written back to the LANCOM router, the VPN profile file is created and saved to the specified directory.
Image Removed
Image Added


4) Importing the VPN client certificate into the LANCOM Advanced VPN Client
4.1) In the LANCOM Advanced VPN Client, open the option Configuration
->
Certificates.
Image Removed
Image Added
4.2) Create a new certificate configuration using the Add button.
Image Removed
Image Added
4.3) Enter a name for the new certificate configuration.
  • In the Certificate field, select the option from PKCS#12 file
  • In the PKCS#12 file name field, set the path to the certificate file for the VPN client.
  • For better security, this example requires the password of the VPN client certificate to be entered before each connection over VPN.
Image Removed
Image Added


5) Import the *.ini file and the configuration of the VPN connection into the LANCOM Advanced VPN Client
5.1) In the LANCOM Advanced VPN Client open the option Configuration
->
Profiles and click Add/import.
Image Removed
Image Added
5.2) Select the option Profile import.
Image Removed
Image Added
5.3) Set the path to the VPN profile file that was created in the step of 3.13.
Image Removed
Image Added
5.4) Click on Finish to conclude the import.
Image Removed
Image Added
5.5) Select the imported profile and then click Next.
5.6) Change to the Identities menu and deselect the Pre-shared key option.
5.7) You need to set the Certificate configuration to the certificate configuration created in step 5.3 (in this case: Cert).
Image Removed
Image Added
5.8) This concludes the configuration. Close the dialogs of the LANCOM Advanced VPN Client with OK.


6) Function check:
6.1) In the LANCOM Advanced VPN Client, click the Connection button.
6.2) Enter the password that you assigned to the VPN-client certificate.
Image Removed
Image Added
6.3) The VPN connection will be established and is ready for use.