Versionen im Vergleich

Schlüssel

  • Diese Zeile wurde hinzugefügt.
  • Diese Zeile wurde entfernt.
  • Formatierung wurde geändert.


Seiteneigenschaften


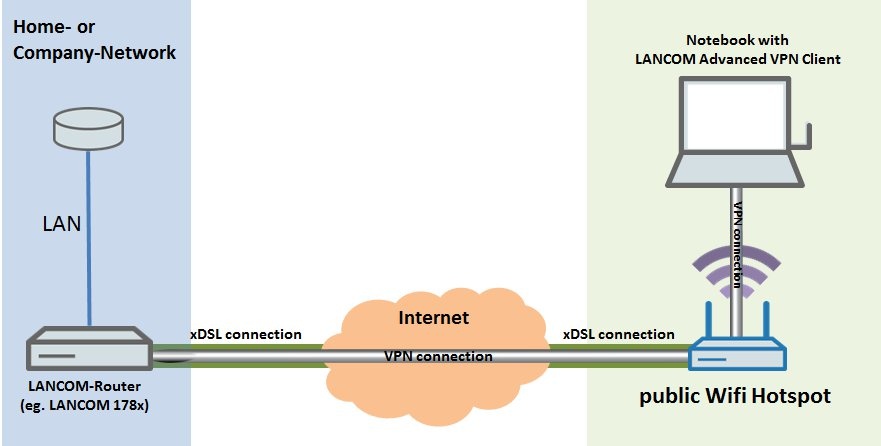
Description:
This document describes how you use the LANCOM Advanced VPN Client to establish an encrypted VPN connection to a LANCOM router, which you can use to securely "surf" the Internet and access network resources at home or at the company—especially if your laptop is connected via a public WLAN hotspot.
Using this configuration, all of your data is transferred to your LANCOM router via the encrypted VPN connection and it cannot be intercepted by third parties.
This guarantees maximum security, so you can send and recieve e-mails without concern. If your data transmission were to be unencrypted, you would have to encrypt your e-mails themselves in order to prevent third parties from reading them. Another advantage is that by connecting through the VPN to your home or office network, you are connected to the Internet with your own public IP address, so your identity is unequivocal.
Note:
The data transmitted to your LANCOM router via the VPN connection passes through your home or office Internet connection twice. Depending on the speed of your connection, can may lead to limitations in the data throughput.

Requirements:

Scenario:
  • A laptop has the LANCOM Advanced VPN Client installed on it, and this has the VPN connection profile for a LANCOM router on a home or office network.
  • The laptop is connected to a public hotspot via Wi-Fi. The data transmitted between the laptop and the Internet should not be visible to other users connected with the public hotspot, or its operators.
  • The laptop uses the LANCOM Advanced VPN Client to connect to the LANCOM router in your home or company network. All of the Internet traffic is then transferred over the encrypted VPN connection. This makes it impossible for third parties to read this data.
  • What's more, the VPN connection provides encrypted access on the local network resources on the home or office network (database servers, etc.).
Image Removed

Image Added


Procedure:

1) Configuring a dynamic DNS service on the LANCOM router:

If your Internet connection has no fixed public IP address, an alternative is to use a dynamic DNS service, which makes a connection between the dynamic (i.e. daily changing) public IP address of your Internet connection and an unchanging DNS address of your choice, e.g. company.dyndns.org.

1.1) Open the configuration of your LANCOM router with LANconfig and run the Setup Wizard.

1.2) Select the option Configure dynamic DNS.

Image Removed

Image Added

1.3) Select your dynamic DNS provider from the list of supported providers.

Image Removed

Image Added

1.4) In the next dialog, select the Remote site of the connection for which the dynamic IP address should be updated. In most cases this is the connection to your ISP (Internet service provider).

Note:
The dynamic DNS provider receives an update each time this device connects to the remote site (e.g. following a forced re-connect).

Image Removed

Image Added

1.5) In this dialog, enter the DNS resolvable name along with the credentials for your dynamic DNS account.

Image Removed

Image Added

1.6) After confirming the final dialog with Finish, DNS updates are configured and the configuration is saved to your router.

Image Removed

Image Added


2) Configuring the VPN Client connection on the LANCOM router:

2.1) Using LANconfig, open the configuration of your LANCOM router and run the Setup Wizard.

2.2) Select the option Provide remote access (RAS, VPN).

Image Removed

Image Added

2.3) Select the option VPN connection over the Internet.

Image Removed

Image Added

2.4) In the following dialog, set the client to LANCOM Advanced VPN Client for Windows. A simplified setup procedure is available with the option 1-Click-VPN.

Note:
In the case of 1-Click-VPN, all required keys (e.g. the preshared key) are automatically created by random number generator. The Setup Wizard also deduces most of the settings required for the VPN connection from the settings in the LANCOM router.

Image Removed

Image Added

2.5) Enter a name for the VPN client connection. You must also set the Address of this router to its public IP address or the dynamic DNS address used for the LANCOM router.

Image Removed

Image Added

2.6) Set a range of local IP addresses to be used for the VPN client dial-ins.

Image Removed

Image Added

2.7) Optionally enable the NetBIOS module if you require the NetBIOS functions.

Image Removed

Image Added

2.8) In the next dialog window, click on the Browse... button to set a location to save the profile file.

Image Removed

Image Added

2.9) The Finish button exits the configuration wizard. The configuration is uploaded to the LANCOM router and the profile file is saved to your PC.

Image Removed

Image Added


3) Importing the VPN Client profile into the LANCOM Advanced VPN Client:

3.1) Start the LANCOM Advanced VPN Client and open the menu Configuration

-> Profiles

→ Profiles.

Image Removed

Image Added

3.2) Click the button Add/Import.

Image Removed

Image Added

3.3) Select the option Profile import.

Image Removed

Image Added

3.4) Specify the path to the import file (*.ini).

Image Removed

Image Added

3.5) In the dialog window that follows, click on Next.

Image Removed

Image Added

3.6) A message is displayed after the profile was imported successfully. Click on Finish to complete the import.

Image Removed

Image Added


4) Verify that all data is transmitted over the VPN connection:

Once you are connected to your LANCOM router via VPN, you can verify that all of your data (including the Internet traffic) is transmitted over the VPN connection by using the following check:

4.1) In the LANCOM Advanced VPN Client, open the settings for the imported VPN profile and navigate to the menu Split tunneling.

4.2) This table should not contain any entries to remote networks, so as to ensure that connections are always established to the tunnel endpoint of the gateway.

Image Removed

Image Added