Anmelden
Zur Navigation springen
Zur rechten Seitenleiste springen
Zum Hauptinhalt springen
Zum Footer springen
Zum Suchen „Eingabe“ drücken
Bereiche
Hilfe
Onlinehilfe
Tastenkombinationen
Feed-Builder
Neuigkeiten
Verfügbare Gadgets
Informationen zu Confluence
Anmelden
LANCOM Support Knowledge Base
Seiten
Blog
Seitenhierarchie
Seiten durchsuchen
Konfigurieren
Bereich konfigurieren
Seite anzeigen
Änderungshistorie
Seiteninformation
In Seitenhierarchie anzeigen
Quelle anzeigen
Seiten
Welcome to the LANCOM Support Knowledge Base
Setting up an ADSL or VDSL connection with a specified VLAN ID on a LANCOM R&S®Unified Firewall (PPPoE)
Seitenhistorie
Versionen im Vergleich
Alte Version
2
changes.mady.by.user
LANCOM Redaktion
Gespeichert am
Okt. 25, 2019
verglichen mit
Neue Version
3
changes.mady.by.user
LANCOM Redaktion
Gespeichert am
Feb. 21, 2024
Nächste Änderung: Unterschiede zwischen Versionen 3 und 4
Seitenhistorie anzeigen
Schlüssel
Diese Zeile wurde hinzugefügt.
Diese Zeile wurde entfernt.
Formatierung wurde geändert.
Seiteneigenschaften
Description:
This article describes how an ADSL or VDSL connection implemented via an upstream DSL modem and using a VLAN ID can be set up on a Unified Firewall (PPPoE) and how this can be assigned to an Internet object on the desktop.
Requirements:
LANCOM R&S® Unified Firewall
with
firmware as of version 10.2
Internet access via upstream DSL modem
Web browser for configuring the Unified Firewall.
The following browsers are supported:
Google Chrome
Chromium
Mozilla Firefox
Internet access via upstream DSL modem
Procedure:
1) Setting up the network connection for Internet access:
1.1) Open the configuration interface of the Unified Firewall in your browser, change to the
menu
menu
Network
->
→
Connections
->
→
Network Connections
and click on the chevron icon to enter the
advanced view
.
Image Removed
Image Added
1.2) Delete the entry for the
interface
interface
eth0
.
Info:
By default the interface
eth0
eth0
is set to
DHCP
.
Image Removed
Image Added
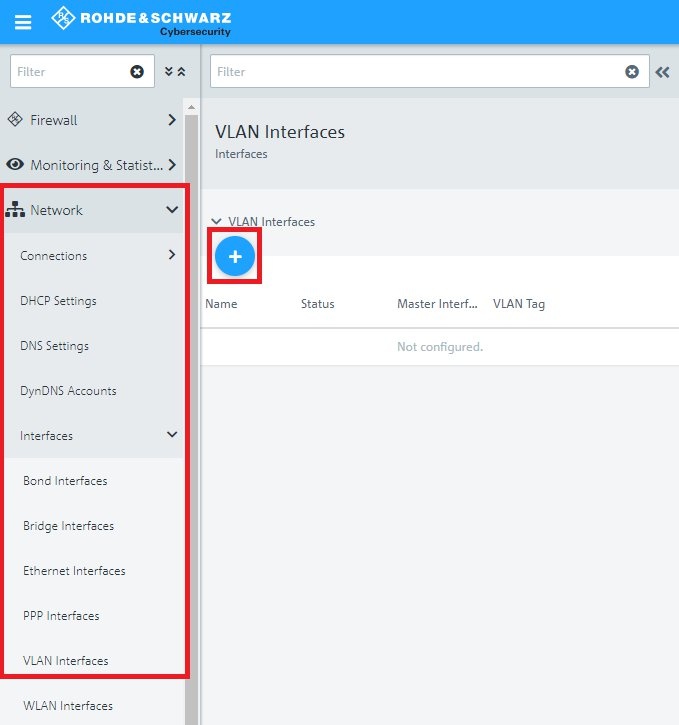
1.3) Navigate to the menu
Network -> Interfaces -> VLAN Interfaces
and click on the “+” icon to create a new entry.
Image Removed
Image Added
1.4) Enter the following parameters:
Master Interface
: From the drop-down menu, select the interface
eth0
.
VLAN Tag
: Enter the
VLAN ID
assigned to you by your provider.
Image Removed
Image Added
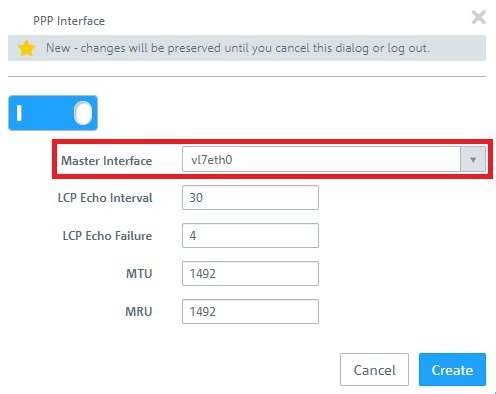
1.5) Navigate to the menu
Network -> Interfaces -> PPP Interfaces
and click on the “+” icon to create a new
PPP interface
.
Image Removed
Image Added
1.6) For
Master Interface
, select the
VLAN Interface
created in
step 1.4
.
Image Removed
Image Added
1.7) Change to the menu
Network -> Connections -> PPP Connections
and click on the “+” icon under
PPP Connections
to create a new entry.
Image Removed
Image Added
1.8) Enter the following parameters:
Name
: Enter a
descriptive name
.
Interface
: Select the
PPP interface
created in
step 1.6
.
Type
: Check that the value is set to
PPPoE
.
Username
: Enter
Username for DSL dial-in
assigned to you by your provider.
Password
: Enter the
password for DSL dial-in
assigned to you by your provider.
Image Removed
Image Added
2) Create a desktop object for the Internet connection:
2.1) Click the button to
Create an Internet object
.
Image Removed
Image Added
2.2) Enter the following parameters:
Object Name
: Enter a
descriptive name
.
Connections
: From the drop-down menu, select the
PPP Connection
created in
step 1.8
and click on the “+” icon to add the object.
Image Removed
Image Added
3) Saving and activating the configuration steps:
3.1) Click on the
Activate
button to accept the changes and enable filtering.
Image Removed
Image Added
Überblick
Inhalte
{"serverDuration": 404, "requestCorrelationId": "ae02582513cf864f"}
Nach oben