Versionen im Vergleich

Schlüssel

  • Diese Zeile wurde hinzugefügt.
  • Diese Zeile wurde entfernt.
  • Formatierung wurde geändert.
Seiteneigenschaften


Description:
In a Public Spot scenario, it may be desirable to create different Public Spot SSIDs for different user groups (e.g. normal and premium).
For Public Spot vouchers to be created using the Setup Wizard, a separate administrator needs to be created for each SSID.
This article describes how to use a “Circuit ID” to control which SSID a Public Spot user can connect to.
Info:
Info

The Circuit ID identifies the interface used by a terminal (e.g. a notebook) to issue a DHCP request.


Requirements:

  • LCOS as of version 9.10 (download latest version)
  • LANtools as of version 9.10 (download latest version)
  • Any web browser (for access using WEBconfig)
  • SSH client for command-line access (e.g. PuTTY)
  • Installed and functional Public Spot
  • Installed and functional WLAN controller (in a WLAN controller scenario)


Configuration:
1) Check that the Public Spot SSID is assigned to the logical WLAN interface:
1.1) Connect to the web interface of the access point using a web browser and navigate to the path LCOS menu tree
->
Status
->
WLAN
->
Networks.
Image Removed
Image Added
1.2) Check which logical interface (Ifc) the Public Spot SSIDs (Network Name) are assigned to.
Image Removed
Info
Info:

You can also view the information using the CLI command ls Status/WLAN/Networks/.


Image Added


2) Setting the Circuit ID under DHCP snooping:
2.1) Open the configuration for the access point in LANconfig and switch to the menu item Interfaces
->
Snooping
->
DHCP snooping.
Image Removed
Image Added
2.2) Select the logical WLAN interface (see step 1.2) and adjust the following parameters.
  • Set a checkmark next to Add agent info.
  • For Circuit ID, set the variable %s.
Info:
Info

The variable %s inserts the WLAN SSID if the DHCP packet originates from a WLAN client.

Image Removed

Image Added

Important:
Hinweis

In a WLAN controller scenario, these settings must also be set on the access points. These settings can be rolled out to the access points using a script and the WLAN controller

(also see DokumentlinksymbolImage Removed)

.

AP_Circuit-ID_Skript.lcsImage Removed

View file
nameAP_Circuit-ID_Skript.lcs
height150

The sample script installs the settings for the logical interfaces WLAN-1, WLAN-1-2, WLAN-2 and WLAN-2-2. Adjust the script according to your needs if necessary.


3) Add the called-station attribute in the Public Spot:

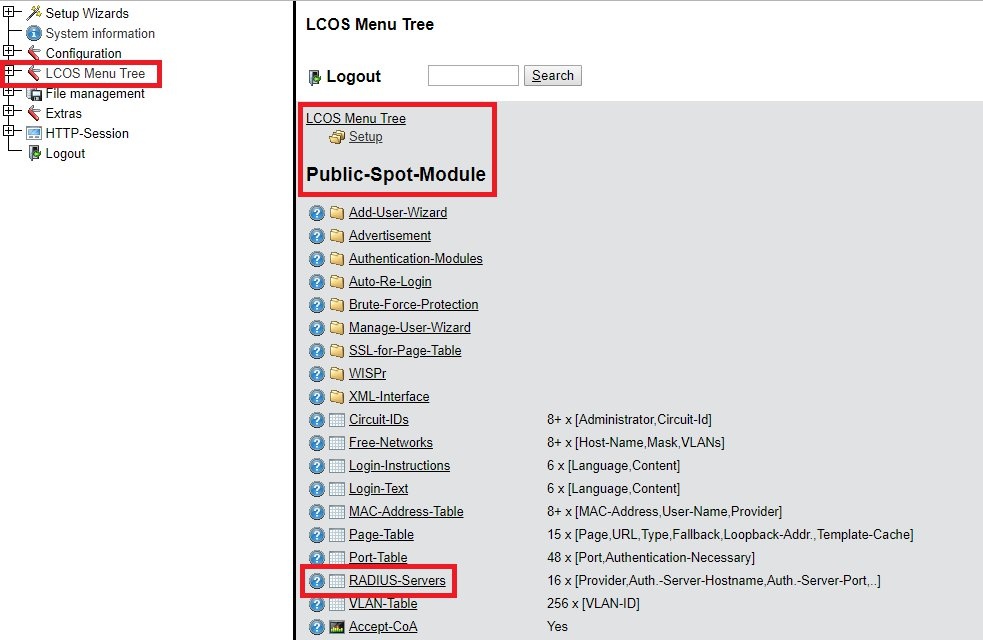
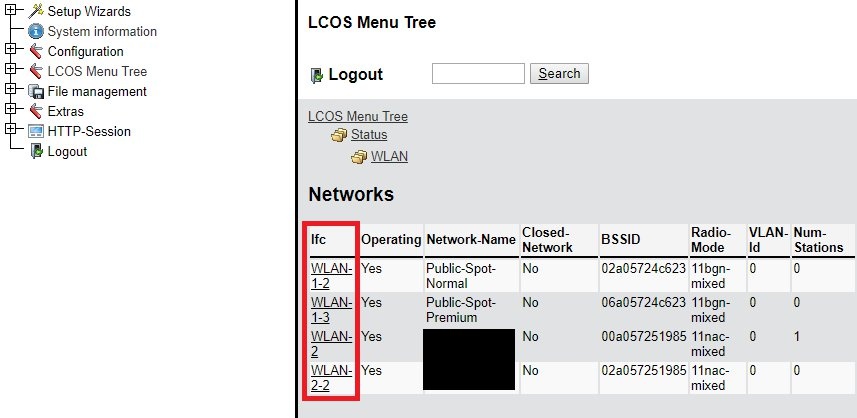
3.1) Connect to the web interface of the Public Spot gateway using a web browser and navigate to the path LCOS menu tree
->
Setup
->
Public-Spot-Module
->
RADIUS-Servers.
Image Removed
Image Added
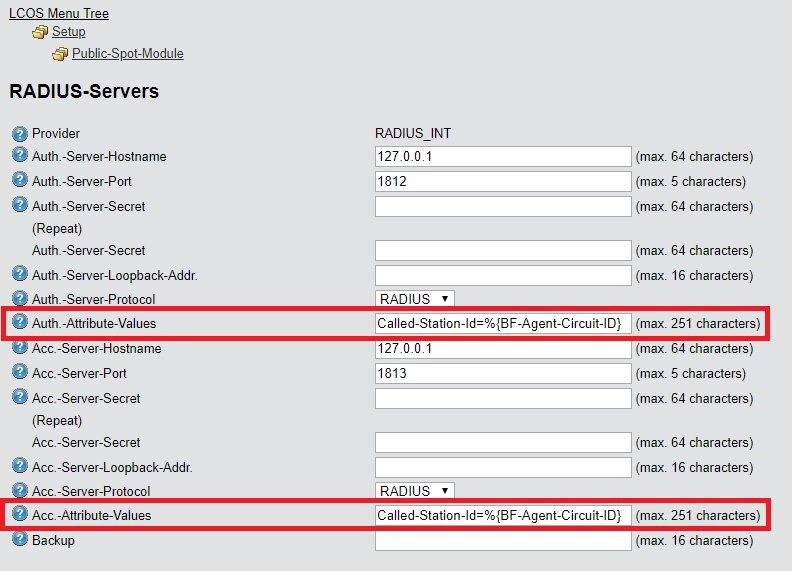
3.2) Edit the entry and save the following parameters:
  • Auth.-Attribute-Values: Called-Station-Id=%{BF-Agent-Circuit-ID}
  • Acc.-Attribute-Values: Called-Station-Id=%{BF-Agent-Circuit-ID}
Image Removed
Image Added


4) Create two administrators who can create new Public Spot users:
4.1) Open the configuration for the Public Spot gateway in LANconfig and switch to the menu item Management
->
Admin
->
Further administrators.
Image Removed
Image Added
4.2) Create two new entries and modify the following parameters:
  • Administrator: Enter a descriptive name.
  • Password: Set a password for the administrator.
  • Access rights: From the drop-down menu, select None.
  • Function rights: Remove all of the functions except Public Spot wizard (add user) and Public Spot wizard (manage user).
Image Removed
Image Added
Image Removed
Image Added


5) Assign the Circuit ID for the Public Spot administrator:
Each Public Spot administrator is able to create vouchers for a certain Public Spot SSID.
5.1) Connect to the web interface of the Public Spot gateway using a web browser and navigate to the path LCOS menu tree
->
Setup
->
Public-Spot-Module
->
Circuit-IDs.
Image Removed

Image Added
5.2) Create two new entries and set the following parameters:
  • Administrator: Enter the Public Spot administrators created in step 4.
  • Circuit-Id: Enter the associated Public Spot SSID (see step 1.2).
Image Removed
Image Added


6) Creating a Public Spot voucher with the Setup Wizard:
6.1) Connect to the Public Spot gateway using a web browser and log in as the appropriate Public Spot administrator (see step 4).
Image Removed
Image Added
6.2) Now create the Public Spot vouchers in the usual manner.
Image Removed
Image Added


7) Manually assigning the Public Spot SSID for existing Public Spot vouchers (optional):
Important:
Hinweis

If a voucher is not assigned to a particular Public Spot SSID, the access credentials are valid for all of your Public Spot SSIDs.

7.1) Open the configuration for the Public Spot gateway in LANconfig and switch to the menu item RADIUS

->

Server

->

User table.

Image Removed
Image Added
7.2) Edit the appropriate voucher and set the called station to the Public Spot SSID (see step 1.2).
Image Removed
Image Added