This document describes a way to integrate a LANCOM R&S® Unified Firewall into an existing network that uses a LANCOM router as the gateway.
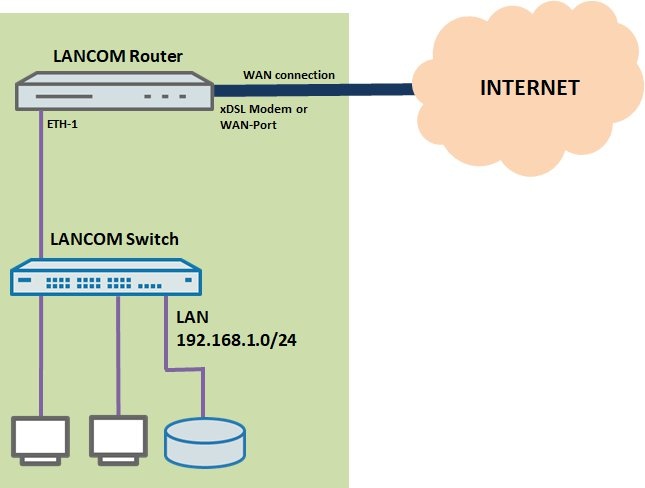
Current situation:- This document assumes a simple network scenario where a LANCOM router operates as a central gateway for the internal network services (e.g. DHCP) and also provides Internet access.
- The Internet connection is implemented using the xDSL modem integrated in the LANCOM router or via the WAN interface (for devices without a modem).
- The local network (IP address range 192.168.1.0/24) is connected via the Ethernet interface ETH-1 to a LANCOM switch, which the local network components (PC, notebook, server, etc.) are connected to.
- The other Ethernet interfaces of the LANCOM router (e.g. ETH-2 to ETH-4) are also set up for the local network (default setting).
- This network scenario is to be extended with an additional component, a LANCOM R&S® Unified Firewall, and the least possible configuration effort is to be used.
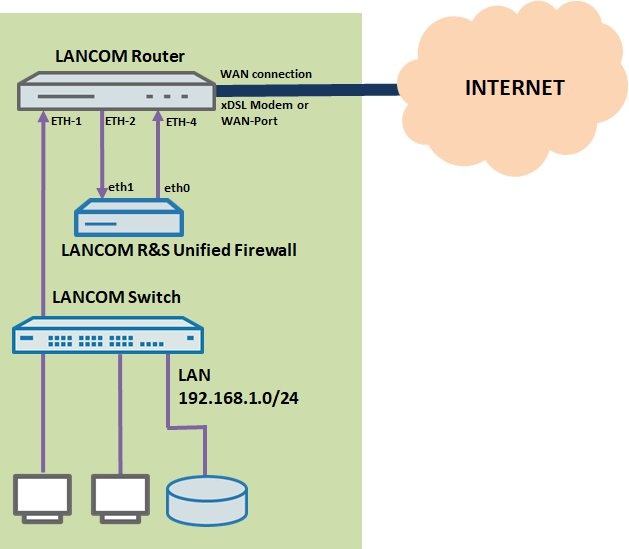
 Target situation:
This way of integrating the Unified Firewall is also referred to as a
Layer-3 loop.
- The firewall is connected to two Ethernet ports on the LANCOM router (in this case ETH-2 and ETH-4) and via an additional “transfer” network, which has to be configured on the LANCOM router.
- We will use the default networks, which are configured on the Unified Firewall with its factory default settings:
- eth1: 192.168.1.0/24
- eth0: 192.168.0.0/24
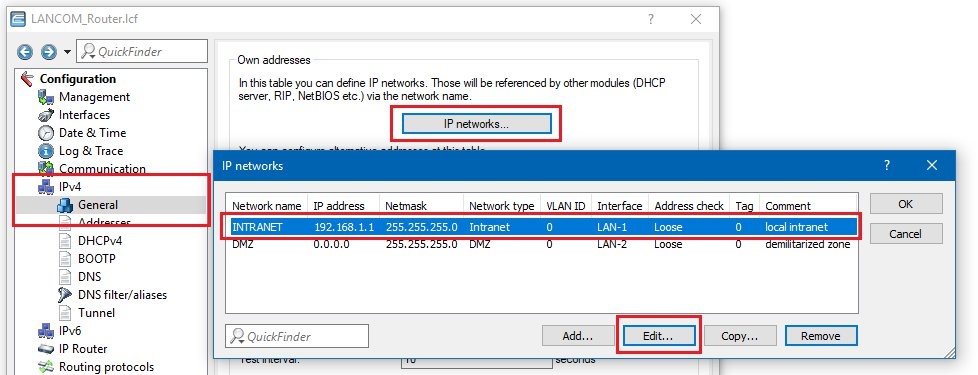
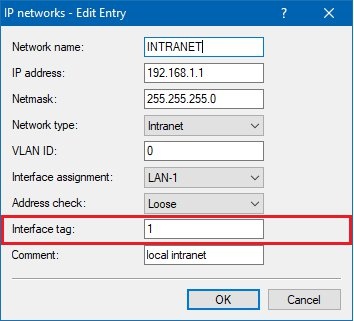
2.1) In LANconfig, open the configuration dialog for the LANCOM router and switch to the menu item IPv4 -> → General -> → IP networks.
2.3) Change the
interface tag from
0 to
1.
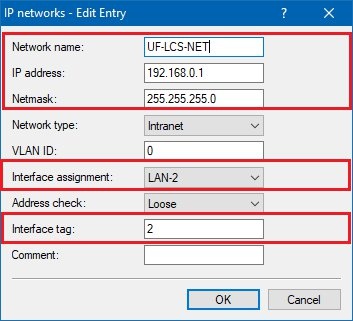
2.4) Add a
new IP network and configure the following parameters:
- Enter a descriptive name.
- Set the IP address and netmask to 192.168.0.1 and 255.255.255.0, respectively.
This is the IP address of the LANCOM router in the transfer network, which is connected to the port eth0 on the Unified Firewall.
- Set the logical interface assignment to LAN-2.
- Set the Interface tag to the value 2.
2.5) Click
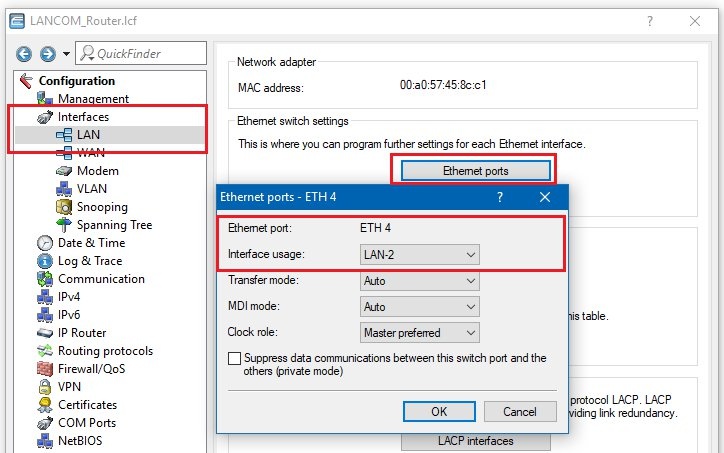
OK to accept the values and then navigate to the menu
Interfaces -> LAN -> Ethernet ports -> ETH 4.- Since the LANCOM Ethernet port ETH-4 is connected to the Unified Firewall port eth0, which supports the local network 192.168.0.0/24, the LANCOM Ethernet port ETH-4 must also support the same IP network.
You achieve this by setting the interface used for the logical network to LAN-2.
2.6) The
configuration of the LAN interfaces in the LANCOM router should then
appear as follows.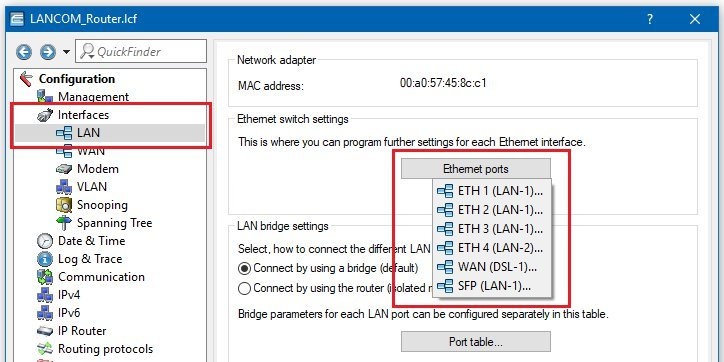
2.7) Write the configuration back to the LANCOM router.
The Unified Firewall is not yet fully integrated into the network. All of the Internet traffic still goes past the Unified Firewall without inspection.
This is changed in the final step 4 by modifying the routing rules in the LANCOM router.3) Configuration steps on the Unified Firewall:3.1) Basic network configuration:3.1.1) Log in to the configuration interface of the Unified Firewall with
administrator rights.
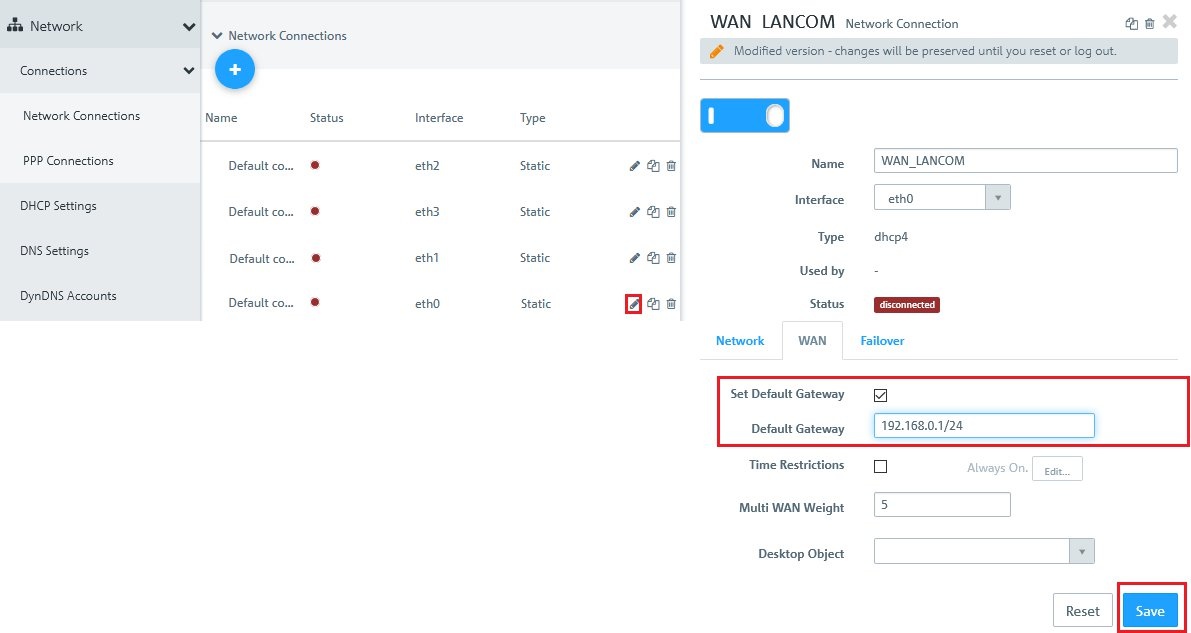
3.1.2) Navigate to the menu
Network -> Network connections and
edit the
default network for the Ethernet interface eth0.
- Enter a descriptive name for this network. From the perspective of the Unified Firewall, this network is on the WAN side, so we’ve given it the name WAN_LANCOM.
- Set the Default Gateway to the IP address of the LANCOM router in this network. In this example it is 192.168.0.1/24 (see step 2.4).
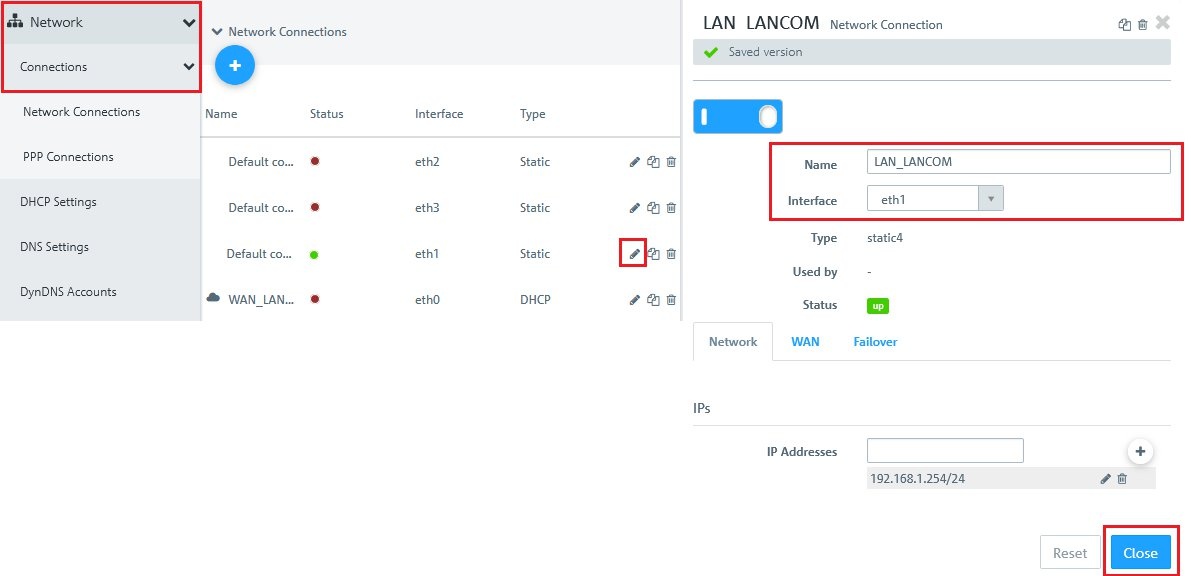
3.1.3)
Edit the
default network for the Ethernet interface eth1.
- Enter a descriptive name for this network. From the perspective of the Unified Firewall, this network is on the LAN side, so we’ve given it the name LAN_LANCOM.
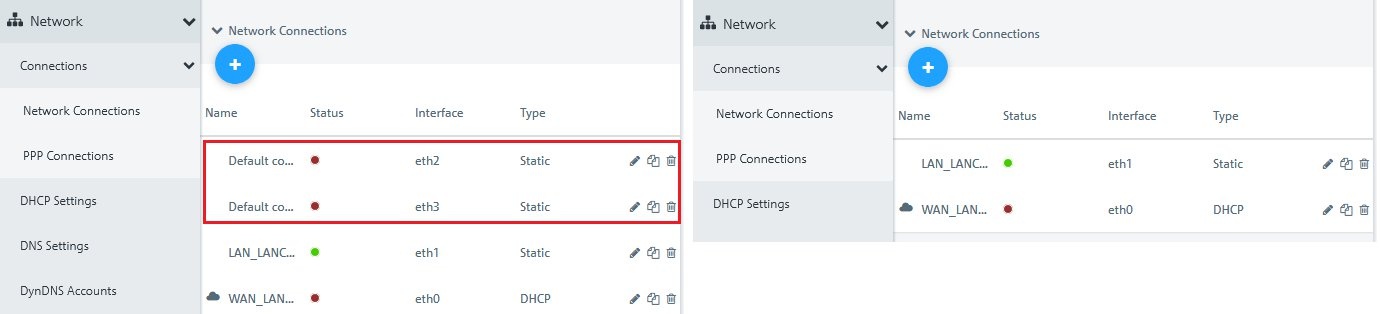
3.1.4) Because the other two
default networks (eth2 & eth3) are not required, you can
delete these from the configuration.
 3.2) Configuring the packet filter in the Unified Firewall:
3.2.1) Setting up the
packet filter configures the basic functionality of the Unified Firewall.
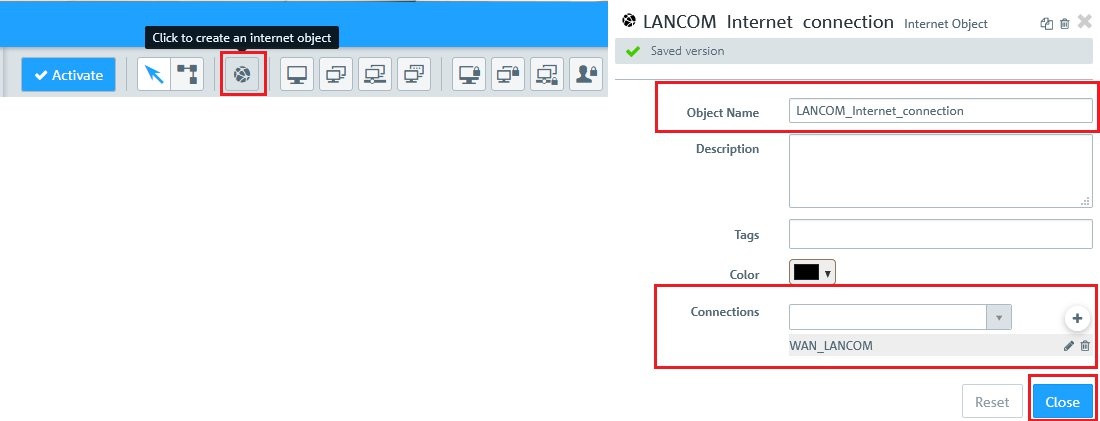
The first thing to do is to
create an Internet object using the desktop objects toolbar:
- Give the new Internet object a descriptive name.
- To set the connection, use the “+” symbol in the blue circle and select the WAN_LANCOM connection created in step 3.1.2.
- You then create the Internet object.
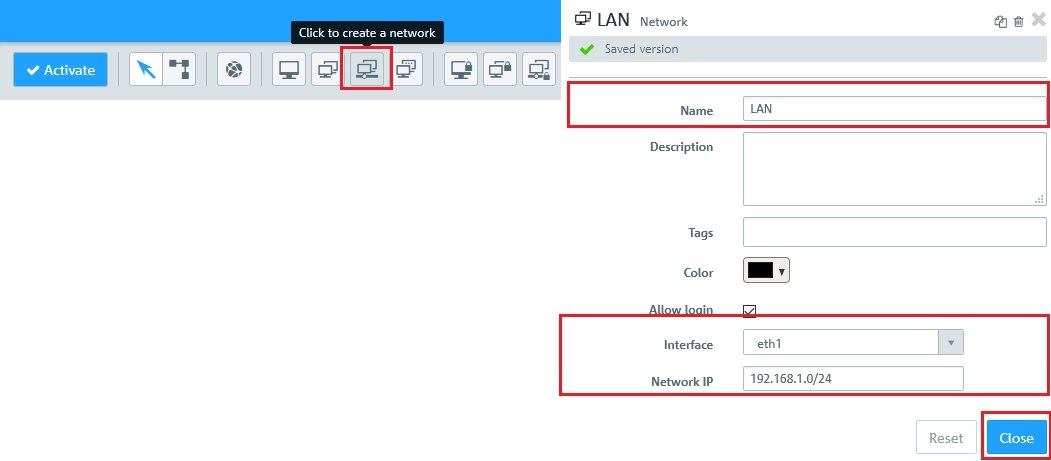
3.2.2) In the next step, add a
network to the configuration by means of the desktop objects toolbar.
- Give the new network object a descriptive name.
- Since the LAN represents the local network 192.168.1.0/24 from the perspective of the firewall, you must select the Ethernet interface eth1 and enter the IP address range in the field Network IP.
- You then create the network object.
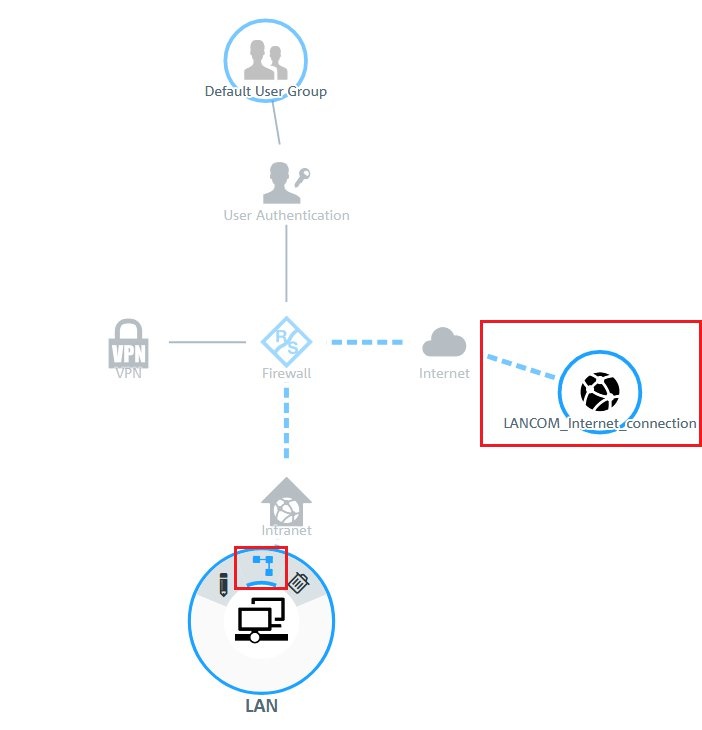
3.2.3) On the
desktop of the firewall configuration, click on the
LAN network object and select the Link icon.
3.2.4) Use the mouse to click on the
Internet object you created (a
blue dashed line is drawn between the two objects).
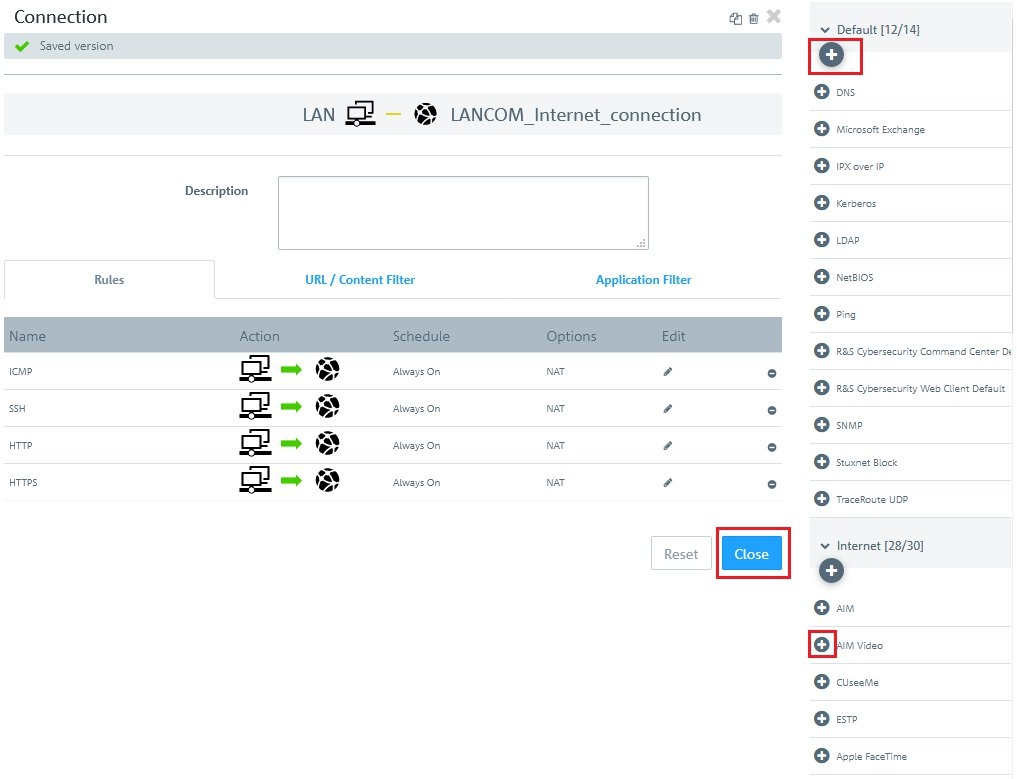
3.2.5) In the
Connection dialog, you can
add one of the services from the
selection list on the right-hand side by clicking on the
“+” character in front of the service.
- If you wish to add complete groups of services, click on the “+” character in front of the respective service group (e.g. “Internet”).
In this configuration example, the Unified Firewall should
allow the outgoing communication of the protocols ICMP, SSH, HTTP and HTTPS to the Internet.
3.2.6) When you are ready, you
create the new connection rule.
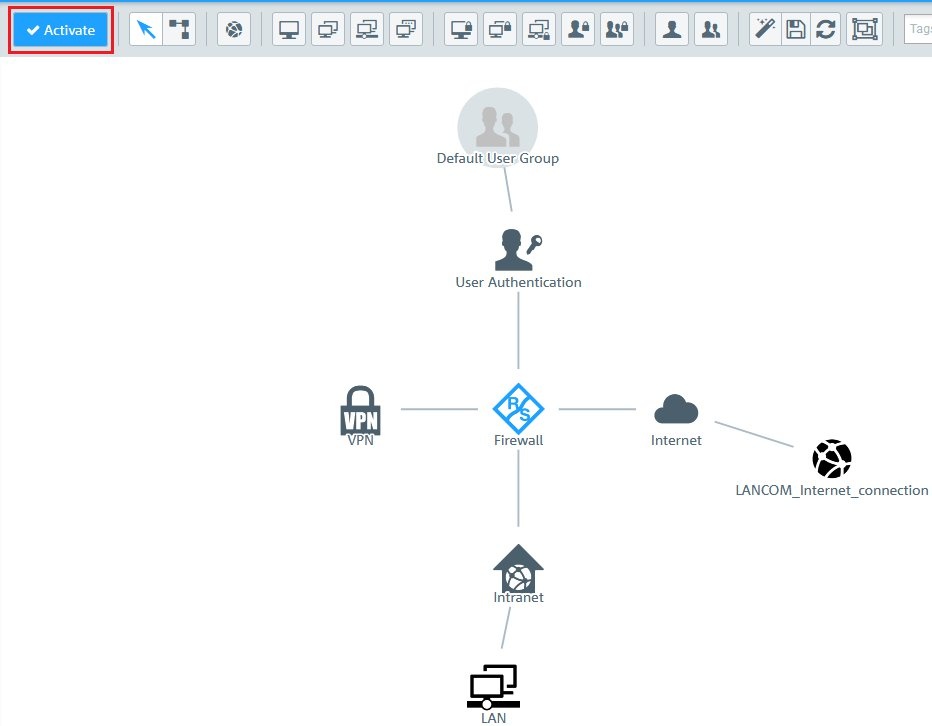
3.2.7) To
put the configuration into effect, go to the
menu bar and click the button
Activate.
 Although
 the Internet connection of the Unified Firewall is now set up, the
status of the connection “WAN_LANCOM” in the menu
Network -> Connections -> Network Connections will still be displayed with the status
RED.

Running a
traceroute to the IP address 8.8.8.8 (tracert 8.8.8.8) from a network PC shows that the
data does not flow through the Unified Firewall; instead, the
LANCOM router is forwarding the connection directly to the Internet. We will change this with the
configuration steps that follow in step 4.
4) Final configuration steps on the LANCOM router:With these final configuration steps,
the Unified Firewall is integrated into the network so that
all Internet traffic flows through the firewall and is regulated by it.
4.1) In LANconfig, open the
configuration dialog for the LANCOM router and switch to the menu item
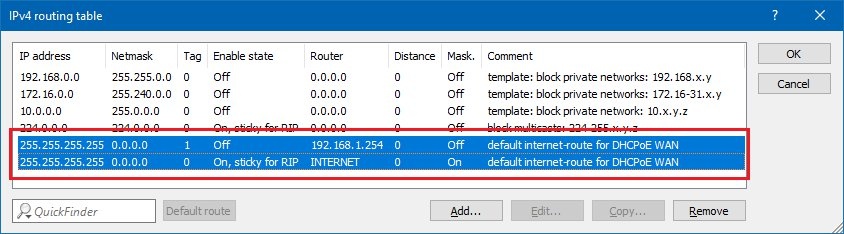
IP router -> Routing -> IPv4 routing table.
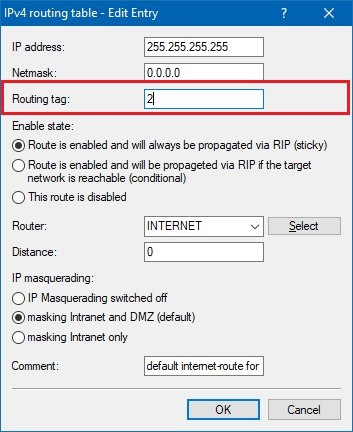
4.2) Open the
configuration of the existing default route by clicking
Edit.
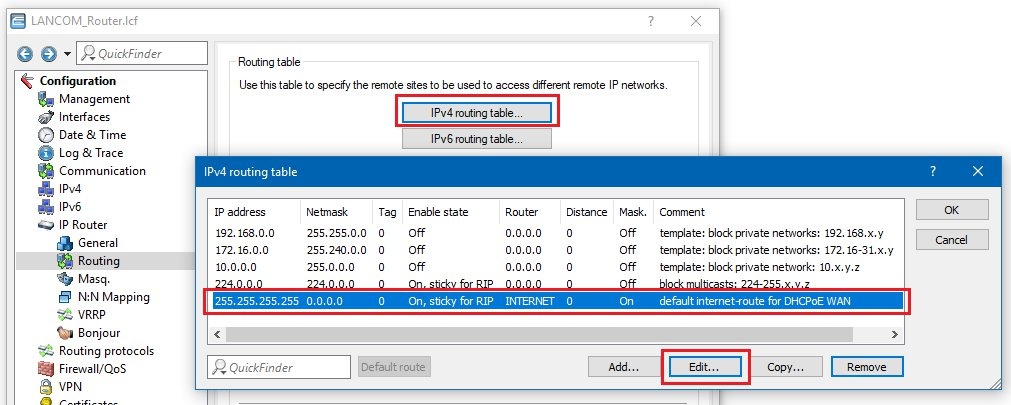
4.3) Change the
routing tag from
0 to
2.
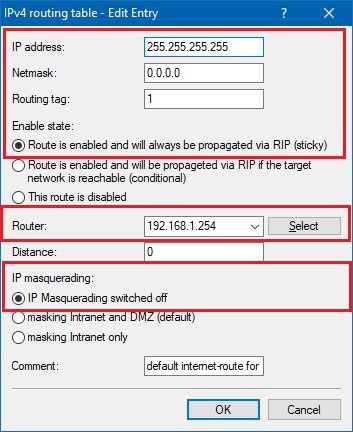
4.4) Add a
new routing tag and configure the following parameters:
- Assign the IP address 255.255.255.255 and the netmask 0.0.0.0.
- Set the Interface tag to the value 1.
- In the Router field you now enter the IP address of the Unified Firewall where it can be reached from the local network 192.168.1.0/24. In this example it is the address 192.168.1.254 (see steps 1.3 and 1.4).
- Switch the IP masquerading for this route off.
4.5) The configuration of the two default routes should then
look like this.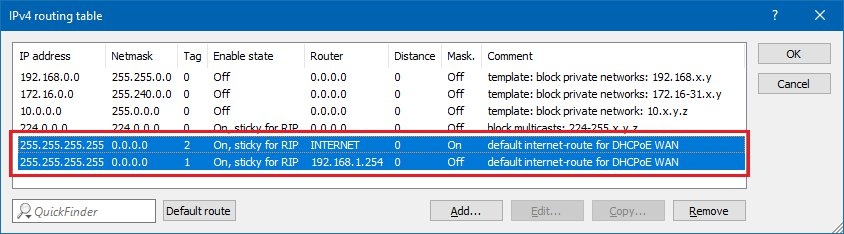
4.6) Write the configuration back to the LANCOM router.
All Internet traffic now passes through the Unified Firewall.Note:test thiscommand-line interface on a network PCexecuting a trace route to the public IP address 8.8.8.8 (tracert 8.8.8.8)configurationof the Unified Firewall, the network connection
WAN_LANCOM will now be displayed as activegreen Tip:
Tip:If you need to
remove the Unified Firewall from the communication and
direct all Internet traffic exclusively via the LANCOM router again, all you have to do in this scenario is to
disable the default route to the Unified Firewall and
reconfigure the original default route back to the routing tag 0 (see the figure below).