Versionen im Vergleich

Schlüssel

  • Diese Zeile wurde hinzugefügt.
  • Diese Zeile wurde entfernt.
  • Formatierung wurde geändert.


Seiteneigenschaften


Description:
Since LCOS version 8.80, the LANCOM Public Spot Wizard offers you an easy and convenient way to configure a Public Spot scenario.
The new function LANCOM Smart Ticket now permits user-friendly access to the Public Spot by sending the login data by e-mail.
This document describes how you set up a Public Spot scenario with the LANCOM Public Spot Wizard and send the login data by e-mail.

Requirements:


Scenario:
This Knowledge Base article deals with the configuration of the following scenario:
1) A company operates a LANCOM WLAN router or access point, which is set up with a network for the staff (LAN & WLAN) and also a separate WLAN network for guests.
2) The WLAN network for guests is separated from the "in-house" network. Users who are logged on to the guest network have Internet access only.
3) A guest who wants to connect with the guest network must first connect with the SSID of the guest network via WLAN and then enter the login data to the Public Spot.
4) On the login page of the Public Spot the guest enters an e-mail, which is then sent to the WLAN router or access point. The LANCOM WLAN router or access point then sends the user an e-mail with the login data for the WLAN guest network.
5) Using the login data received by e-mail, the user of the guest network can sign-in to the Public Spot and access the Internet.
Image Removed
Image Added

Procedure:
1) Configuring the guest WLAN on the LANCOM Public Spot Wizard:
1.1) Launch the Setup Wizard in LANconfig and select the option Public Spot setup.
Image Removed
Image Added
1.2) In the next dialog, select the option Configure a logical WLAN network now.
Image Removed
Image Added
1.3) In the following dialog, select which logical WLAN interface the guest WLAN network is to operate on.
In this example we use the logical WLAN interface WLAN-1-2, because the first logical WLAN interface WLAN-1 is the WLAN for the employees. In the SSID box, enter a name for the guest WLAN.
Image Removed
Image Added
1.4) In the next dialog, enter an IP address for the new guest WLAN. For the netmask we use the address 255.255.255.0.


Hinweis

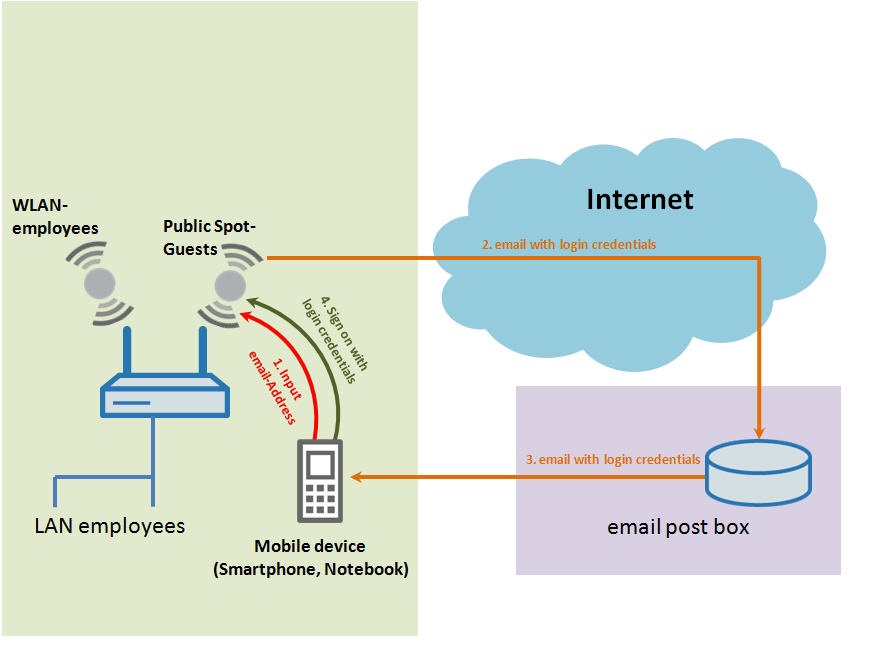
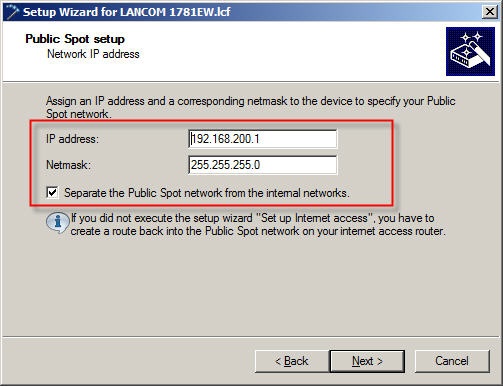
If you are configuring this scenario on a LANCOM access point or your LANCOM router is not the router that connects to the Internet (Internet gateway), then on the upstream router you additionally need to configure a return route to the guest WLAN (in this case: 192.168.250.0/24).

If you do not enter a return route on the upstream router, no Public Spot login page will appear and WLAN internet access for guests will not work!

Image Removed


Image Added
1.5) With the LANCOM Smart Ticket function the user data is created automatically and, after the user time budget has expired, the data is also deleted from the system automatically, so for this example there is no need to configure a Public Spot administrator.
If you wish to do so anyway, then enable the option and assign access credentials accordingly.
Image Removed
Image Added
1.6) Select the method to be used for user login. We recommend the use of the HTTPS method for security reasons.
Image Removed
Image Added
1.7) Click on Finish to close the Wizard and write the configuration back to the LANCOM router or access point.
Image Removed
Image Added
1.8) After writing the configuration back to the device, the Public Spot function is ready to use.
Use your mobile device to connect to the guest WLAN (in this case the network SSID GUEST). If you are connected with the WLAN and you launch a Web browser, the sign-in page of the Public Spot appears.
Image Removed
Image Added
In the next step of the configuration, the Public Spot must be set so that an e-mail address can be entered on the sign-in page, to which an e-mail containing the login data will be sent.


2) Configuring the LANCOM Smart Ticket function (for sending Public Spot login data by e-mail):
2.1) Open the configuration for the LANCOM WLAN router or access point and switch to the menu item Configuration → Log & Trace → SMTP Account. In this dialog, configure the SMTP settings for your e-mail account.
Image Removed
Image Added
2.2) Navigate to the menu Configuration → Public Spot → Authentication.
2.3) Select the option Login data will be sent by email.
Image Removed
Image Added
2.4) In the menu Configuration → Public Spot → Email, enter the configuration parameters.
Image Removed
Image Added
  • In the Sender e-mail address box, enter the sender address to be displayed in the sent e-mails.
  • In the Name of sender window, enter the sender's name to be displayed in the sent e-mails.
Image Removed

Image Added

  • In the E-mail subject window, enter the subject of the sent e-mails. Example: Your Public Spot login data.
Image Removed

Image Added

  • In the E-mail body window, enter the text contained in the sent e-mails. Example: Your password for the LANCOM Public Spot is: $PSpotPasswd
Image Removed

Image Added

2.5) Click on OK to write the edited configuration back to the device. This completes the configuration of the LANCOM Smart Ticket via e-mail function.


3) Function check:
3.1) Use your mobile device to connect to the guest WLAN (in this case the network SSID GUEST). If you are connected with the WLAN and you launch a Web browser, the sign-in page of the Public Spot appears.
3.2) In the e-mail field, enter the e-mail address to which the login data are to be sent and check-mark the option Accept GTC (General Terms and Conditions). Now click on the Request button.
Image Removed
Image Added
3.4) You will soon receive an e-mail with the login data.
Image Removed
Image Added
3.5) Enter your password into the box and click on Log in.
Image Removed
Image Added
3.6) After logging in successfully, the guest WLAN is available and Web pages can be accessed by the browser.
Image Removed
Image Added
Info

You can adapt the appearance of the Public Spot login pages to appear just as you please (e.g. by changing the graphics in the header of the documents). This is described in this Knowledge Base article.