Description: Creating firewall rules with WEBconfig is different to the methods available with LANconfig. This document describes the methodology and syntax required.
Requirements:
Procedure:
In order to avoid having to use the action IDs described below, we recommend that you create firewall objects before you create the actual rules. These object can then be used multiple times for the different rules.
Also, the menu Configuration -> Firewall/QoS -> IPv4 rules -> Rules -> Firewall objects already contains ready-made objects for the most common actions, protocols, source and target addresses (ACCEPT, REJECT, DROP, ANYHOST, LOCALNET, etc.), which can considerably simplify the configuration of firewall rules.
We will demonstrate the process by creating example firewall rules in WEBconfig:
- Block data traffic from a certain source IP address
- Globally allow HTTPS connections
- Guarantee a minimum bandwidth of 256 kbps
Example rule 1: Block data traffic from a certain source IP address:
1.1) Open the configuration of the LANCOM device in WEBconfig, navigate to the menu Configuration -> Firewall/QoS -> IPv4-Rules -> Firewall-Objects -> Object-Table and click the button Add.
1.2) Assign a meaningful name to the object and enter as syntax %A followed by the IP address of the device (e.g. %A10.10.10.1). Then click OK to save the object.
Note:
The Value field accommodates a maximum of 64 characters. In order to use more than 64 characters, an option is to use nested objects. For instructions, see this Knowledge Base article  .
.
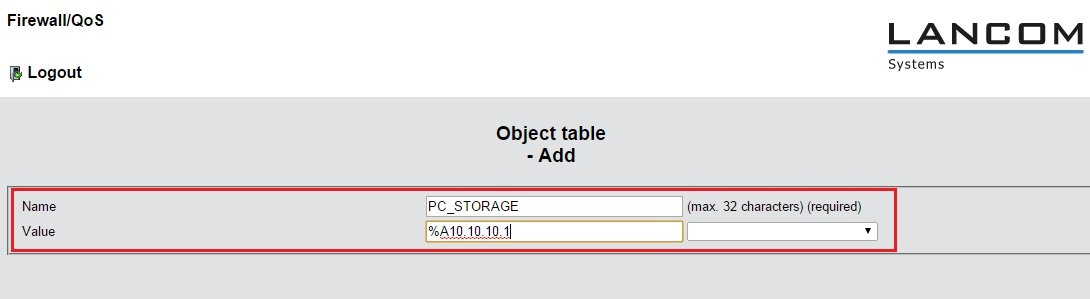
1.3) Click Send to accept the change.
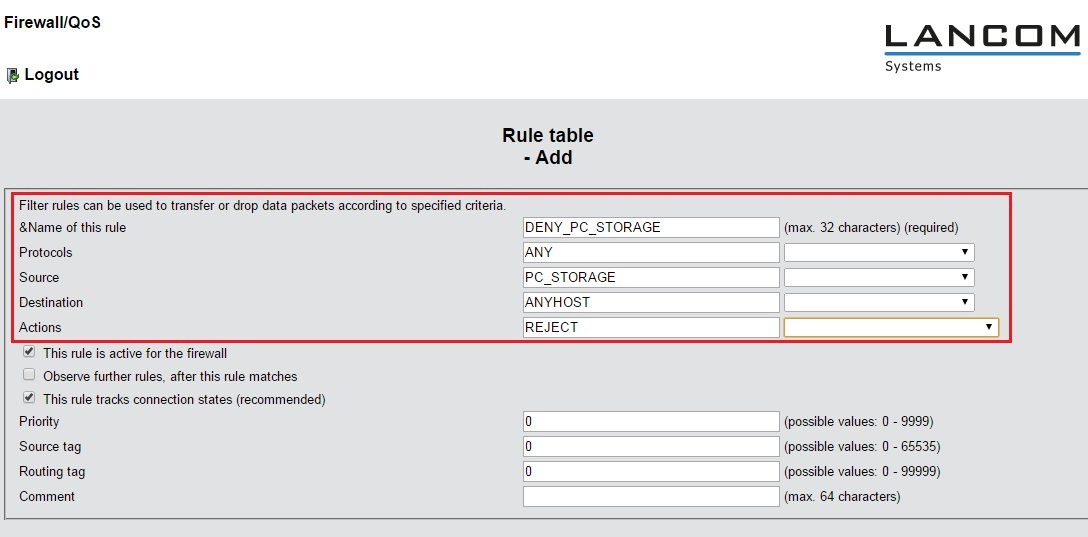
1.13) Open the menu Configuration -> Firewall/QoS -> IPv4 rules and Add a new rule.
- Give the rule a meaningful name.
- Since all protocols should be blocked, you can use the ready-made ANY rule.
- The source is set as the object created in step 1.2, e.g. PC_STORAGE. If you chose not to use a ready-made object, at this point you use the syntax %A10.10.10.1.
- The destination ANYHOST specifies that the rule applies to all destinations.
- The Action is set to the ready-made action object REJECT.
Then click
Send to save the rule.
1.5) Click
Send to accept the change.
Example rule 2: Globally allow HTTPS connections
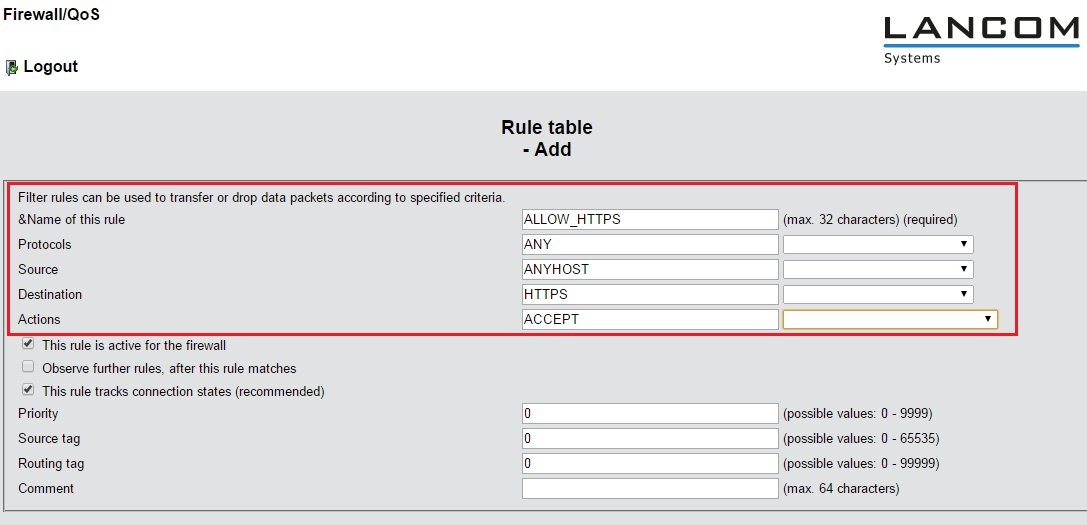
2.1) Open the menu Configuration -> Firewall/QoS -> IPv4 rules -> Rule table and Add a new rule.
- Give the rule a meaningful name.
- Since all protocols should be allowed, you can use the ready-made rule ANY.
- Every client on the network should be able to use HTTPS connections, so for this reason you can enter the ready-made object ANYHOST.
- The destination HTTPS specifies that the rule applies to all destinations. If you chose not to use the ready-made object HTTPS, at this point you use the syntax %S443.
- The Action is set to the ready-made action object ACCEPT.
Then click
OK to save the rule.
2.2) Click
Send to accept the change.
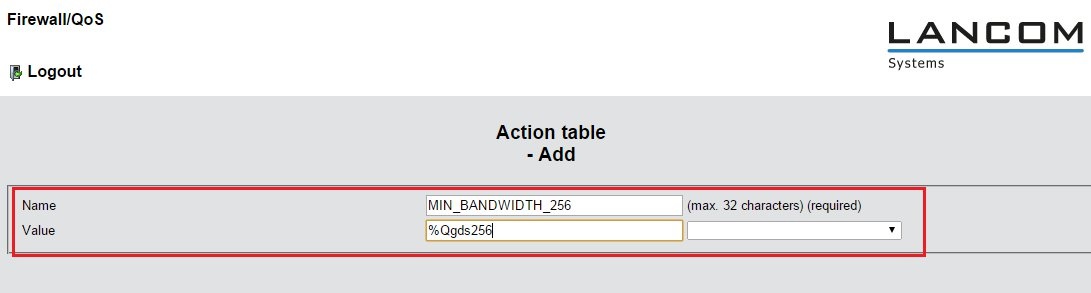
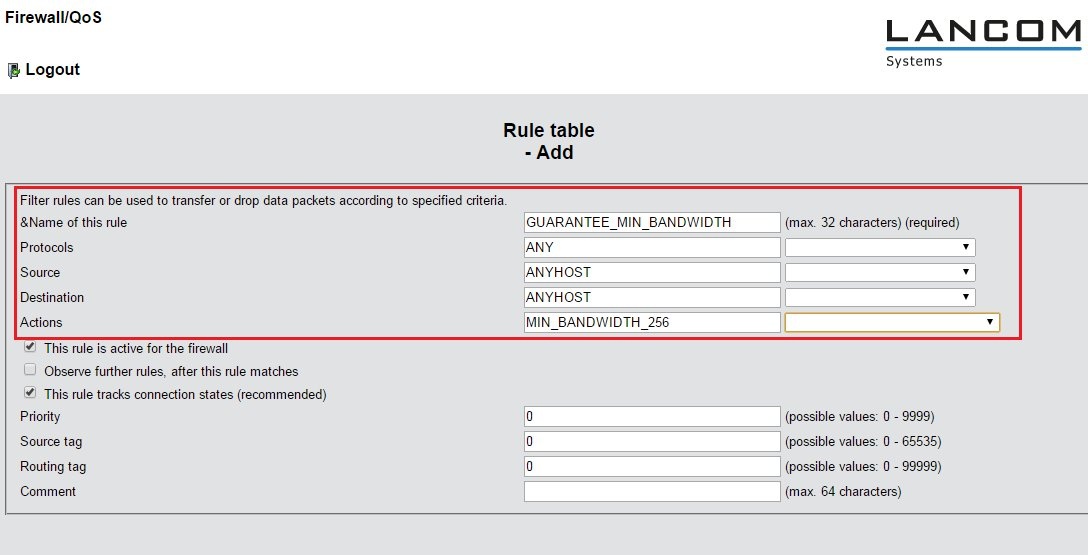
Example rule 3: Guarantee a minimum bandwidth of 256 kbps 3.1) Open the configuration of the LANCOM in WEBconfig, navigate to the menu Configuration -> Firewall/QoS -> IPv4-Rules -> Firewall-Objects -> Actions-Table and click the button Add.
3.2) Give the action a meaningful name and enter as syntax %Qgds256. Then click Send to save the object.
3.3) Open the menu Configuration -> Firewall/QoS -> IPv4 rules -> Rule table and Add a new rule.
- Give the rule a meaningful name.
- Since all protocols should be allowed, you can use the ready-made rule ANY.
- The guaranteed minimum bandwidth should apply to all sources and all destinations, so the ready-made object ANYHOST can be entered for both.
- The Action is set to the action object you created in step 3.2. If you chose not to use the ready-made action object, at this point you use the syntax %Qgds256.
Then click
OK to save the rule.
3.4) Click
Send to accept the change.
Syntax for creating actions:
All actions can be combined with one another in any way. For actions that cancel each other out (e.g.: "Accept" + "Drop"), the system defaults to the more secure version (in this case "Drop").
Action | Description | Action ID |
| Accept | The packet is accepted. | %a |
| Reject | The packet is rejected with a corresponding error message. | %r |
| Drop | The packet is dropped silently. | %d |
| Connect filter | The filter is active if there is no physical connection to the destination of the packet | @c |
| Internet-Filter | This filter is active if the packet is received over the default route, or if it is to be sent | @i |
| Syslog | Provides a detailed message via Syslog. | %s |
| Mail | Sends an e-mail to the administrator | %m |
| SNMP | Sends an SNMP trap | %n |
| Close port | Closes the packet's destination port for a specifiable time | %p |
| Deny host | Blocks the packet's sender address for a specifiable time | %h |
| Disconnect | Disconnects the physical connection to the remote site over which the packet was received or is to be sent. | %t |
| Zero-limit | Resets the limit counter (see below) to 0 when the trigger threshold is exceeded | %z |
- The affected port is entered into a block list
- Other packets to the computer or port are dropped
- The block time is specified in hours (h), minutes (m) or seconds (s) after the action ID (example: %pm10 blocks the port for 10 minutes)
2) Deny host - The sender of the packet is entered into a block list
- The same syntax is used to specify the time as for the close-port action
3) Connect filter / Internet filter - If no further action is added, the firewall automatically combines the filter with Reject.
Syntax for creating limits: Each action can be operated with a limit. If a limit is exceeded, the action that follows it is triggered.
Limits are generally initiated with %l. Then the relation is specified (i.e. connection-related (c) or global (g)). Next is the type of the limit (i.e. data rate (d), number of packets (p), or the packet rate (b)).
Finally, additional parameters are specified such as the time period and size.
Example: %lcds8 This limit takes effect if more than 8 kilobytes/s are transmitted over the current connection. Limit | Description | Action ID |
| Data (abs) | Absolute number of kilobytes over the connection, after which the action is performed | %lcd |
| Data (rel) | Number of kilobytes per second/minute/hour over the connection after which the action is performed | %lcds
%lcdm
%lcdh |
| Packet (abs) | Absolute number of packets over the connection, after which the action is performed | %lcp |
| Packet (rel) | Number of packets per second/minute/hour or in total over the connection, after which the action is performed | %lcps
%lcpm
%lcph |
| Global data (abs) | Absolute number of kilobytes sent to or received from the destination computer, after which the action is performed | %lgd |
| Global data (rel) | Number of kilobytes per second/minute/hour sent to or received by the destination computer, after which the action is performed | %lgds
%lgdm
%lgdh |
| Global packet (abs) | Absolute number of packets sent to or received by the destination computer, after which the action is performed | %lgp |
| Global packet (rel) | Number of packets per second/minute/hour sent to or received by the destination computer, after which the action is performed | %lgps
%lgpm
%lgph |
| Receive option | Limit applies to the receive direction only (in combination with the above limitations). Examples are given in the object ID column | %lgdsr
%lcdsr |
| Transmit option | Limit applies to the transmit direction only (in combination with the above limitations). Examples are given in the object ID column | %lgdst
%lcdst |
- Quality-of-service objects (QoS objects) are special limits that guarantee a minimum bandwidth.
- The same conventions apply as for the limit objects.
- QoS objects are initiated by %q and only differ from limit objects in that, even after the threshold is exceeded, subsequent packets are still accepted.
In this case, the ACCEPT action can be omitted both as a main action or as a triggered action, and the description can be abbreviated accordingly.
Example: %a %qcds8%a %lgds32%d = %qcds8 %lgds32%
