Description:
This document describes how to manually set up DynDNS updates with nsupdate.info.
Requirements:
- Router with a functional Internet connection
Procedure:
1) Switch to the router configuration menu Communication -> General -> Action table.
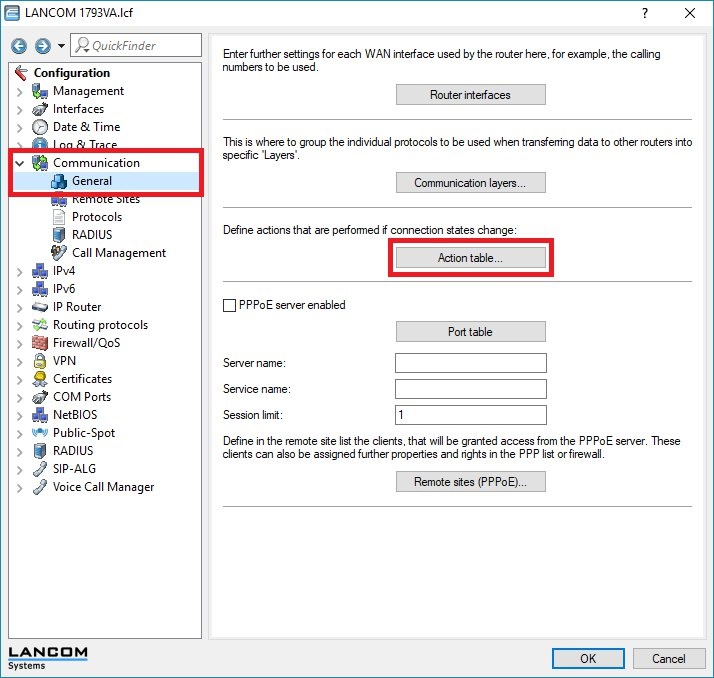
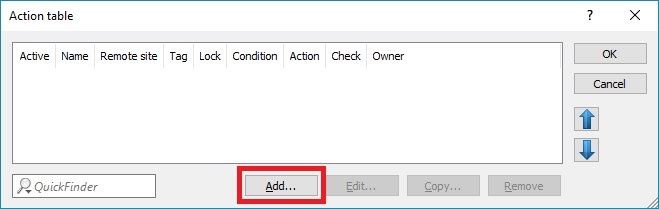
2) You now create 4 new entries in the Action table. Click on the Add button to create each one.
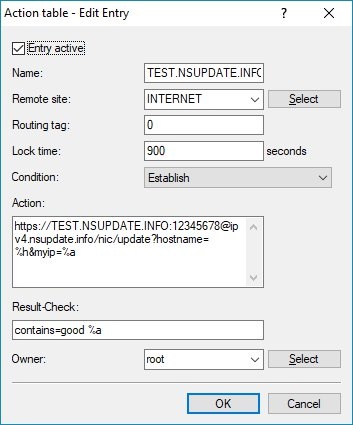
2.1) Create the first entry and enter the following parameters:
- Enter a descriptive name.
- Using the drop-down menu, set the Remote site to the existing Internet connection.
- Set the Lock time to the value 2160000.
- Set the Condition to Establish.
- Under Result check, enter the following string:
contains=good %a?skipiftrue=2
Info:
The 1st entry forces an update of the IP number at the latest after 25 days (2160000 seconds). Most DynDNS providers lock an account if the IP address isn't updated at least once every 25 – 30 days.

2.2) Create the second entry and enter the following parameters:
- Enter the name already entered in step 2.1.
- Using the drop-down menu, set the Remote site to the existing Internet connection.
- Set the Condition to Establish.
- Enter the following command under Action:
dnscheck:<domain>
Replace the placeholder <domain> by the domain name.
- Under Result check, enter the following string:
isequal=%a?skipiftrue=1
Info:
The second entry is triggered with each re-connect. It checks the IP address that your provider has stored for your domain. If the entry is identical to the current IP address, steps 3 and 4 are skipped. If the entry is not the same, steps 3 and 4 are carried out.

2.3) Create the third entry and enter the following parameters:
- Enter the name already entered in step 2.1.
- Using the drop-down menu, set the Remote site to the existing Internet connection.
- Set the Lock time to the value 900.
- Set the Condition to Establish.
Info:
The 3rd entry then transmits your current IP address, just in case the DNS check produced a different result. A 900-second lock prevents your IP address from being transmitted too often, in which case the provider may lock your account.
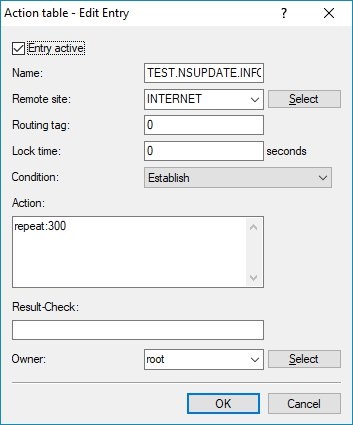
2.4) Create the fourth entry and enter the following parameters:
- Enter the name already entered in step 2.1.
- Using the drop-down menu, set the Remote site to the existing Internet connection.
- Set the Condition to Establish.
- Enter the following command under Action:
repeat:300
Info:
The fourth entry causes these steps to be repeated after 300 seconds, just in case of any transmission errors.
3) Write the configuration back to the router.

4) Lastly, disconnect the Internet connection or restart the router, reconnect to the Internet and activate the entries in the action table.
- Disconnecting from the Internet
- You can use LANmonitor to disconnect from the Internet by marking the Internet connection, right-clicking and choosing Disconnect from the context menu.
- You can also disconnect from the Internet from the CLI using the command do Other/Manual-Dialing/Disconnect <Internet-Connection>.
- Restarting the router:
- You can restart the router from LANconfig by marking the router, right-clicking to open the context menu and choosing reboot.
- The router can also be restarted from the CLI with the command do Other/Cold-Boot.
|
|

