Description: This document describes how certificates created by LANCOM Smart Certificate are used for a certificate-based VPN client connection from an Android device. Requirements:- LCOS as of version 9.10 (download latest version)
- LANtools as of version 9.10 (download latest version)
- Mobile device (smartphone, tablet PC, etc.) with the Android operating system version as of 4.x
- LANCOM central-site gateway, WLAN controller, or LANCOM router with an activated VPN 25 Option
- Certificates for the LANCOM router and Android device. How to create certificates with LANCOM Smart Certificate is described in this Knowledge Base article.
Procedure:
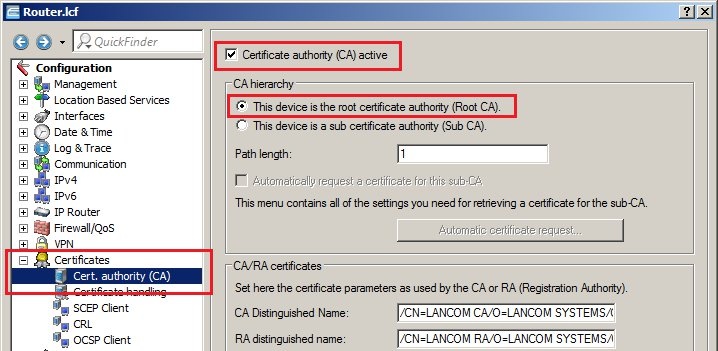
1) Enable the CA function in the LANCOM router 1.1) In LANconfig, open the configuration dialog for the LANCOM router and switch to the menu item Certificates → Cert. authority (CA). 1.2) Set a check mark for the option Certificate authority (CA) active. The LANCOM router functions as the root certificate authority (root CA).
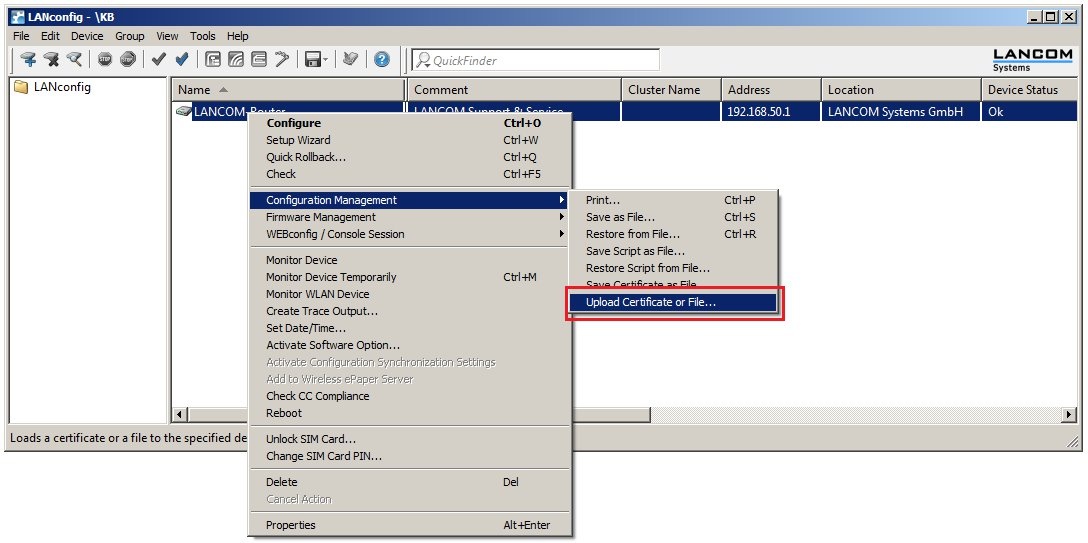
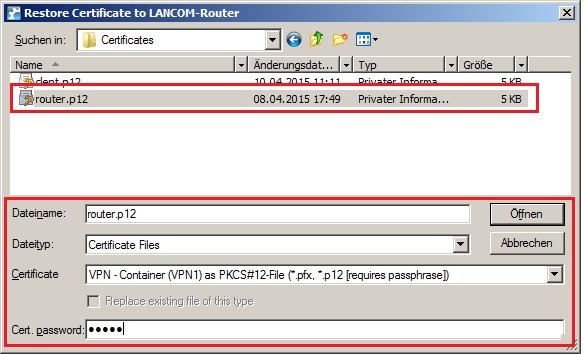
2) Upload the router certificate to the LANCOM router 2.1) Right-click on the LANCOM router in LANconfig and select the option Configuration management → Upload certificate or file. 2.2) In the following dialog select the certificate file intended for the LANCOM router. 2.3) In the certificate type field, select a VPN container. 2.4) In the Cert. password box enter the password for the certificate file. Click on Open to start the upload.
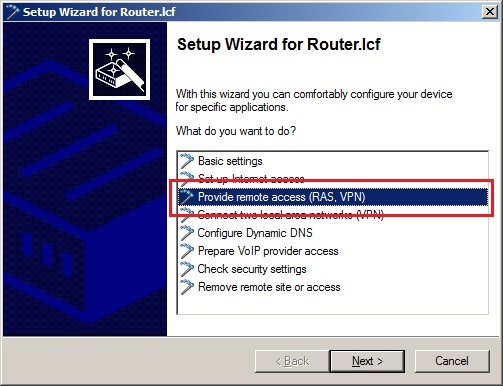
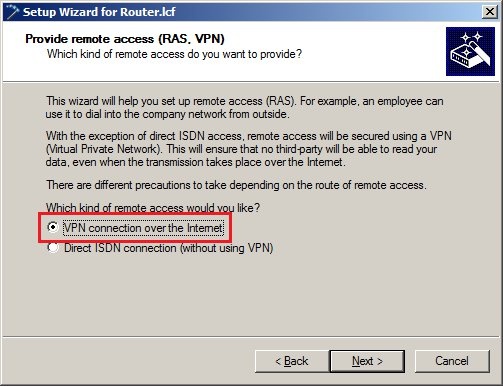
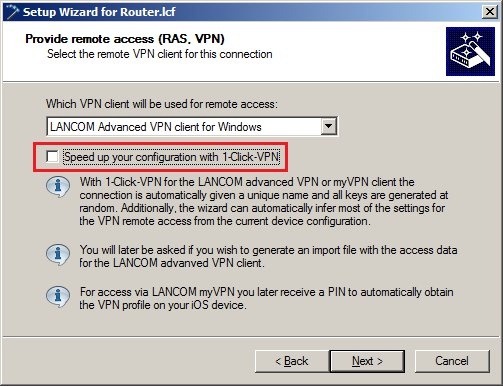
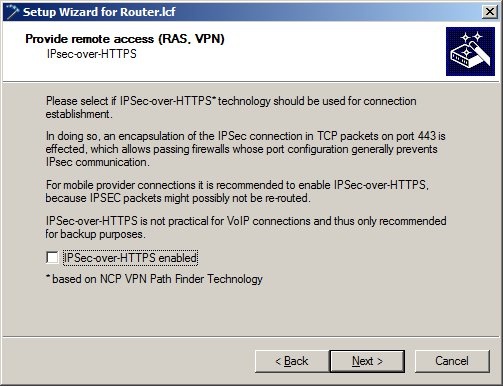
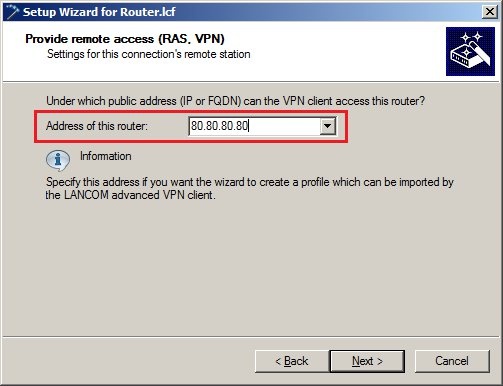
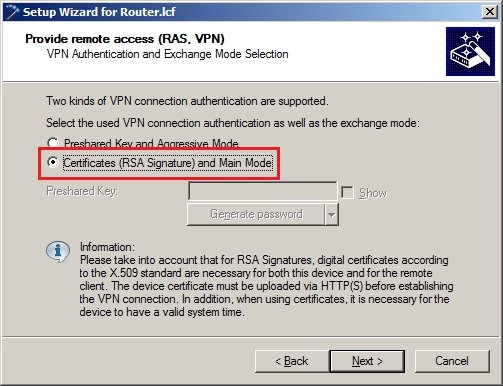
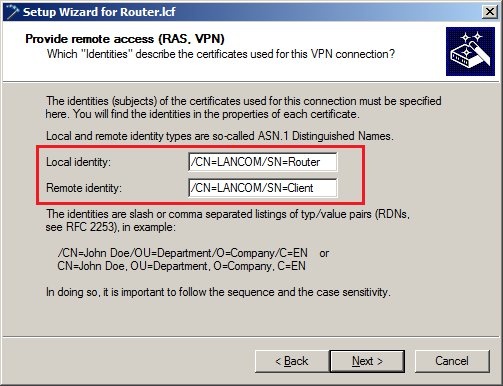
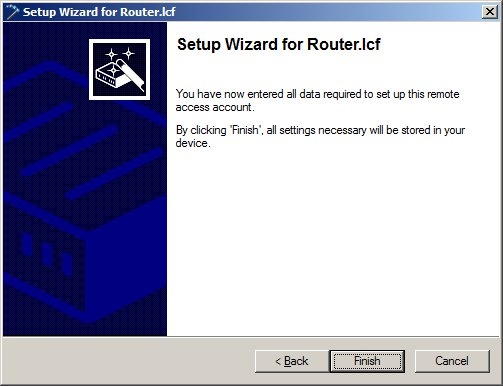
3) Configure the certificate-based VPN client connection on the LANCOM router 3.1) Start the Setup Wizard in LANconfig and select the option Provide remote access (RAS, VPN). 3.2) Select the option VPN connection over the Internet. 3.3) Disable the option ... 1-Click VPN. 3.4) In this example, we do not use IPSec-over-HTTPS. 3.5) Enter a name for the new VPN connection. 3.6) In the next dialog, specify the public IP address or DNS name of the LANCOM router. 3.7) For this connection, select the option Certificates (RSA signature) and main mode for VPN connection authentication. 3.8) In the next dialog box you enter the identities of the certificates. - As the local identity, enter the name of the certificate in the LANCOM router.
- As the remote identity, enter the name of the certificate in the VPN client.
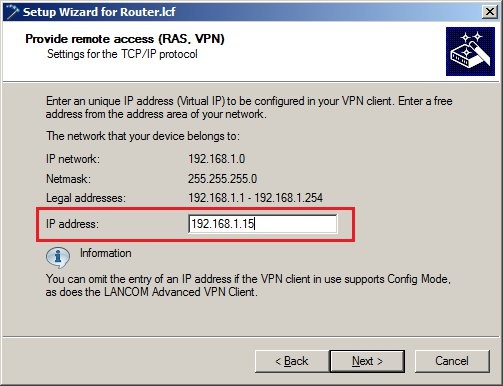
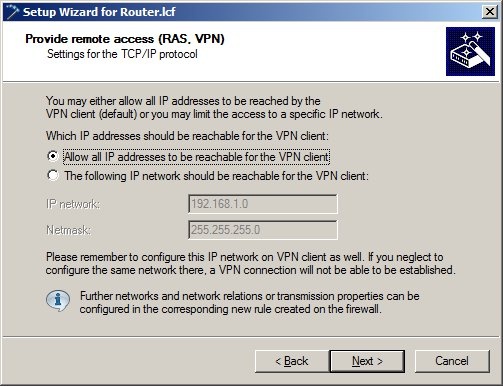
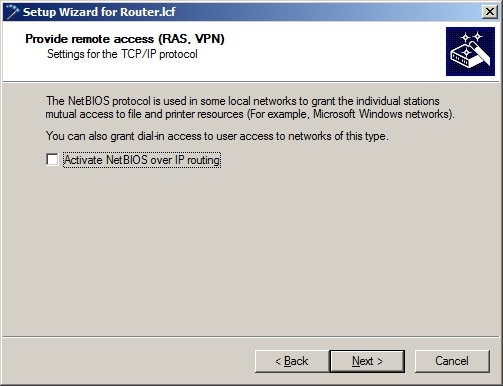
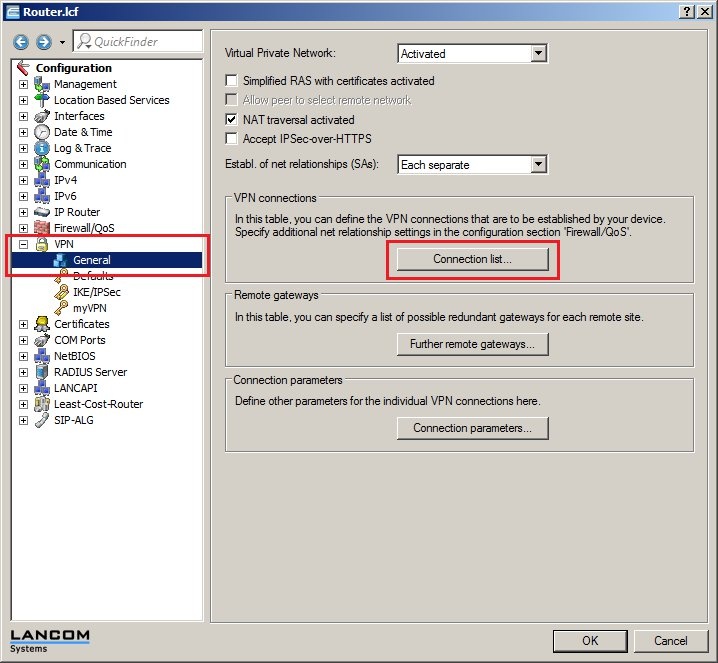
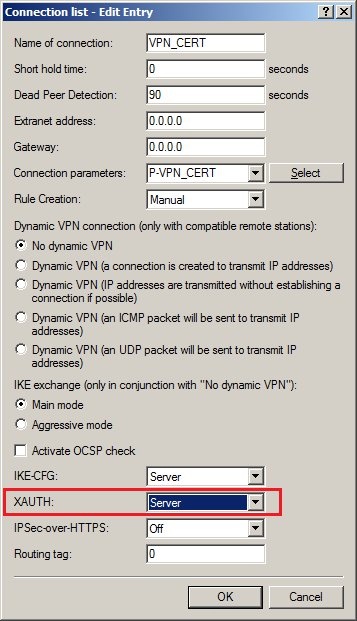
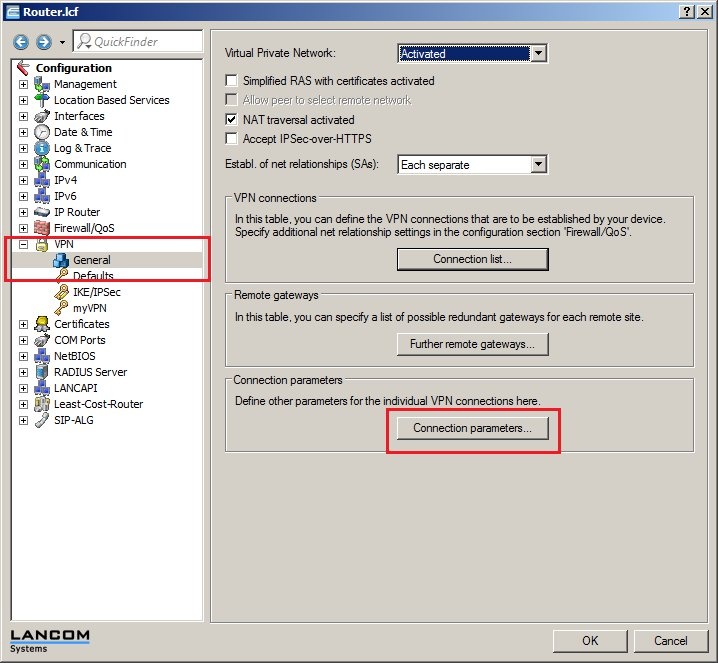
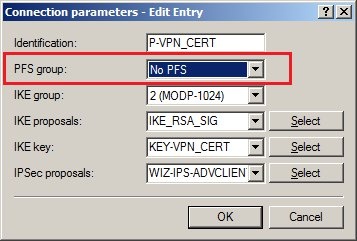
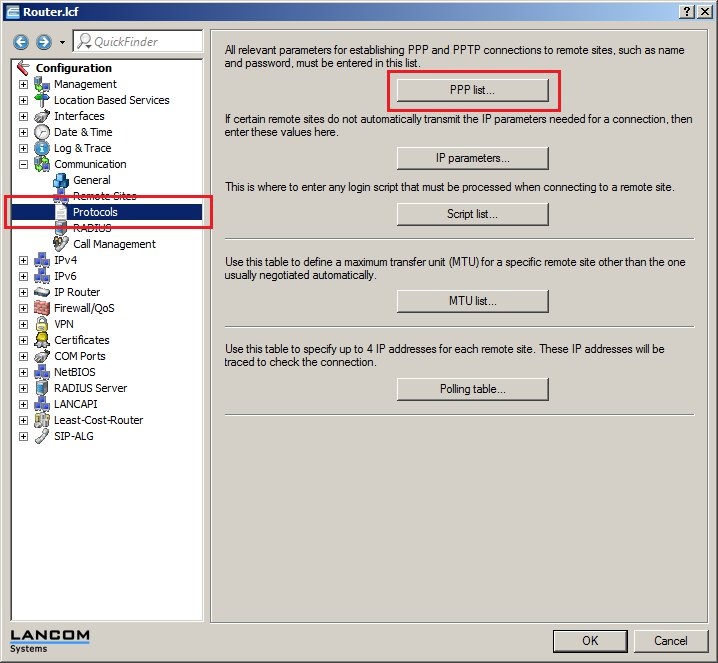
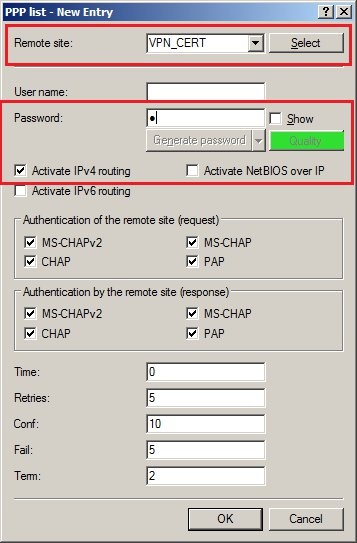
3.9) Enter a local IP address for the LANCOM Advanced VPN Client. 3.10) In this example. all of the local IP addresses should be available to the VPN client. 3.11) NetBIOS is not used in this example. 3.12) In the dialog box that follows, do not select any of the options, because we have to manually configure the VPN connection on the Android device (see step 6). 3.13) Click on Finish to conclude the Setup Wizard. The configuration is written back to the LANCOM router. 3.14) Open the configuration for the LANCOM router and switch to the menu item VPN → General → Connection list. 3.15) Open the entry for the new VPN client connection. 3.16) For the XAUTH option, select the setting Server. Save the change with the OK button. 3.17) Switch to the menu VPN → General → Connection parameters. 3.18) Open the entry for the new VPN client connection. 3.19) Set the PFS group parameter to the value No PFS. 3.20) Change to the menu Configuration → Communication → Protocols → PPP list. 3.21) Add a new entry. - As the Remote site, select the new VPN client connection.
- Set a password in the Password field.
- Enable the option Activate IP routing.
3.22) Save the configuration by clicking the OK button and then write the changes back to the LANCOM router. This concludes the configuration of the LANCOM router.
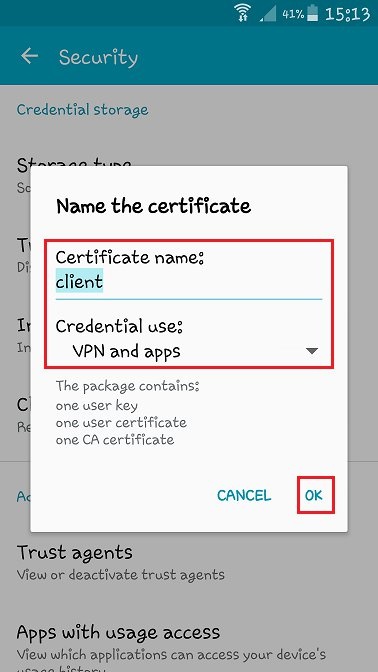
4) Importing a client certificate into the Android device 4.1) Upload the client certificate to the storage in the Android device. 4.2) Navigate to the menu Settings → Security menu and, under Credential storage select the option Install from device storage. 4.3) Select the uploaded certificate file and give it a certificate name of your choice in the following dialog. Set the Credential use to the default (VPN and apps). 4.4) Click on OK to conclude.
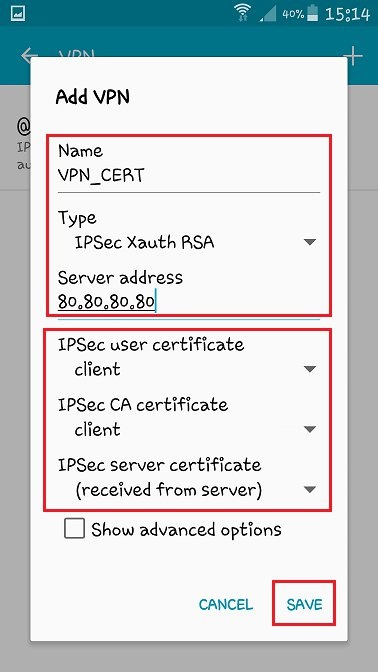
5) Configuring the VPN connection on the Android device 5.1) Navigate to the menu Settings → More settings → VPN 5.2) Tap on Add VPN network to create a new entry. 5.3) In the next dialog box, enter the following settings: - In the Name box, enter a name for the new VPN profile. Use any name you like.
- Set the selection field Type to IPSec Xauth RSA.
- In the Server address field, enter the public IP address or public DNS address of the LANCOM router.
- Set each of the selection fields IPSec user certificate and IPSec-CA certificate to the client certificate.
- In the IPSec server certificate selection box, set the option Received from server.
5.4) Tap Save to store the configured VPN profile.
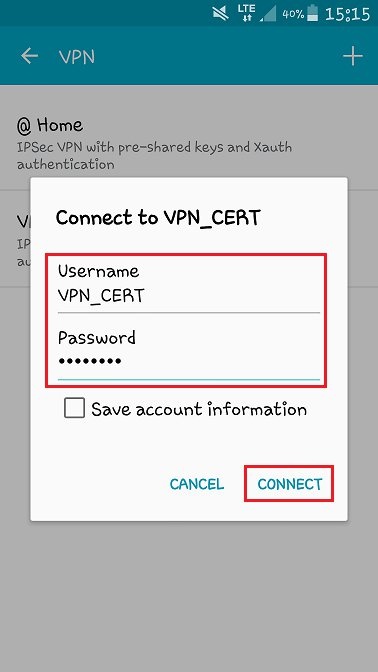
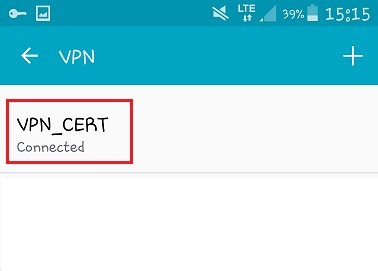
6) Function check: 6.1) To start the VPN connection, just tap the newly created VPN profile. 6.2) In the fields Username and Password you now enter the values that you set when configuring the LANCOM router in step 4.21. - As the Username , enter the name you set for the VPN connection configured in the LANCOM (in this case: VPN_CERT).
- The Password is the one you entered in the PPP list entry.
6.3) Tap Connect to establish the VPN connection to the LANCOM router. This concludes the configuration steps on the Android device. |