Description: If you wish to install a LANCOM Advanced VPN Client of version 3.x or later on a Windows system that already has an older version of the Advanced VPN Client on it, you must first uninstall this software before you can install the LANCOM Advanced VPN Client version 3.x.
Requirements:Procedure: 1) Use the
Profile settings backup in the Configuration menu of the LANCOM Advanced VPN Client (see the instructions at the end of this document).
2)
Copy all backup files to an
external data medium, so that they can be recovered in the event of loss.
3)
Uninstall the LANCOM Advanced VPN Client.
Information: software version 2.32 (build 218- ), the LANCOM Advanced VPN Client has the option to
deactivate the license during the uninstall processBe sure to deactivate the license (see  ).
).
When you perform the deactivation, the current license data is displayed and is sent to you by e-mail. You will need this later when activating the Advanced VPN Client in step 6.
4) Restart the PC after the deinstallation of the LANCOM Advanved VPN Client. Info: If you do not perform the necessary system reboot, you can not install the LANCOM Advanced VPN Client Version 3.x without errors!! 5) Download the
LANCOM Advanced VPN Client version 3.x from the LANCOM Web site (
download).
6) Install the LANCOM Advanced VPN Client version 3.x on the Windows system.
7) Activate the software with your license data.
8) Using the LANCOM Advanced VPN Client, import the profiles backed up in step (1).
Backing up the profile settings: 1) Open you the menu
Configuration -> Profile settings backup -> Create.
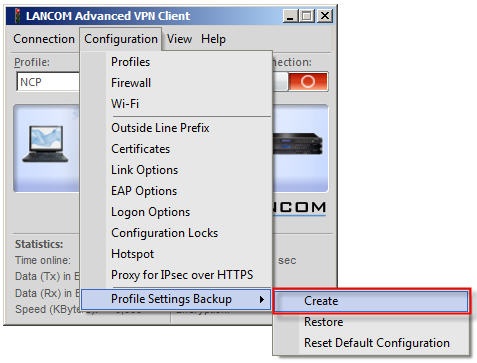
2) Confirm the subsequent message with
Yes.
 Information: The backed-up profile settingsNCPPHONE.SAV
- in the installation directory of the LANCOM Advanced VPN Client. To restore the profile settings, select the menu item
Configuration -> Profile settings backup-> Restore 